Installing Istio
This page shows how to install and configure Istio in a Kubernetes cluster.
Prerequisites
The following instructions assume you have access to a Kubernetes cluster. To install Kubernetes locally, try minikube.
If you are using Google Container Engine, find out your cluster name and zone, and fetch credentials for kubectl:
gcloud container clusters get-credentials <cluster-name> --zone <zone> --project <project-name>If you are using IBM Bluemix Container Service, find out your cluster name, and fetch credentials for kubectl:
$(bx cs cluster-config <cluster-name>|grep "export KUBECONFIG")Install the Kubernetes client kubectl, or upgrade to the latest version supported by your cluster.
If you previously installed Istio on this cluster, please uninstall first by following the uninstalling steps at the end of this page.
Installation steps
For the 0.1 release, Istio must be installed in the same Kubernetes namespace as the applications. Instructions below will deploy Istio in the default namespace. They can be modified for deployment in a different namespace.
- Go to the Istio release page, to download the installation file corresponding to your OS or run
curl -L https://git.io/getIstio | sh -to download and extract the latest release automatically (on MacOS and Ubuntu).
- Extract the installation file, and change directory to the location where the files were extracted. The following instructions are relative to this installation directory. The installation directory contains:
- yaml installation files for Kubernetes
- sample apps
- the
istioctlclient binary, needed to inject Envoy as a sidecar proxy, and useful for creating routing rules and policies. - the istio.VERSION configuration file.
Add the
istioctlclient to your PATH if you download the installation file from Istio release. For example, run the following commands on a Linux or MacOS system:export PATH=$PWD/bin:$PATHRun the following command to determine if your cluster has RBAC (Role-Based Access Control) enabled:
kubectl api-versions | grep rbacIf the command displays an error, or does not display anything, it means the cluster does not support RBAC, and you can proceed to step 5 below.
If the command displays ‘beta’ version, or both ‘alpha’ and ‘beta’, please apply istio-rbac-beta.yaml configuration as show below:
(Note: If you deploy Istio in another namespace than the
defaultnamespace, replace thenamespace: defaultline in all ClusterRoleBinding resources with the actual namespace.)kubectl apply -f install/kubernetes/istio-rbac-beta.yamlIf you get an error
Error from server (Forbidden): error when creating "install/kubernetes/istio-rbac-beta.yaml": clusterroles.rbac.authorization.k8s.io "istio-pilot" is forbidden: attempt to grant extra privileges: [{[*] [istio.io] [istioconfigs] [] []} {[*] [istio.io] [istioconfigs.istio.io] [] []} {[*] [extensions] [thirdpartyresources] [] []} {[*] [extensions] [thirdpartyresources.extensions] [] []} {[*] [extensions] [ingresses] [] []} {[*] [] [configmaps] [] []} {[*] [] [endpoints] [] []} {[*] [] [pods] [] []} {[*] [] [services] [] []}] user=&{user@example.org [...]You need to add the following: (replace the name with your own)
kubectl create clusterrolebinding myname-cluster-admin-binding --clusterrole=cluster-admin --user=myname@example.org- If the command displays only ‘alpha’ version, please apply istio-rbac-alpha.yaml configuration:
(Note: If you deploy Istio in another namespace than the
defaultnamespace, replace thenamespace: defaultline in all ClusterRoleBinding resources with the actual namespace.)kubectl apply -f install/kubernetes/istio-rbac-alpha.yamlInstall Istio’s core components . There are two mutually exclusive options at this stage:
Install Istio without enabling Istio Auth feature:
kubectl apply -f install/kubernetes/istio.yamlThis command will install Pilot, Mixer, Ingress-Controller, Egress-Controller core components.
Install Istio and enable Istio Auth feature (This deploys a CA in the namespace and enables mTLS between the services):
kubectl apply -f install/kubernetes/istio-auth.yamlThis command will install Pilot, Mixer, Ingress-Controller, and Egress-Controller, and the Istio CA (Certificate Authority).
- Optional: Install addons for metric collection and/or request tracing as described in the following sections.
Enabling metrics collection
To collect and view metrics provided by Mixer, install Prometheus, as well as the Grafana and/or ServiceGraph addons.
kubectl apply -f install/kubernetes/addons/prometheus.yaml
kubectl apply -f install/kubernetes/addons/grafana.yaml
kubectl apply -f install/kubernetes/addons/servicegraph.yaml
You can find out more about how to use these tools in Collecting Metrics and Logs.
Verifying the Grafana dashboard
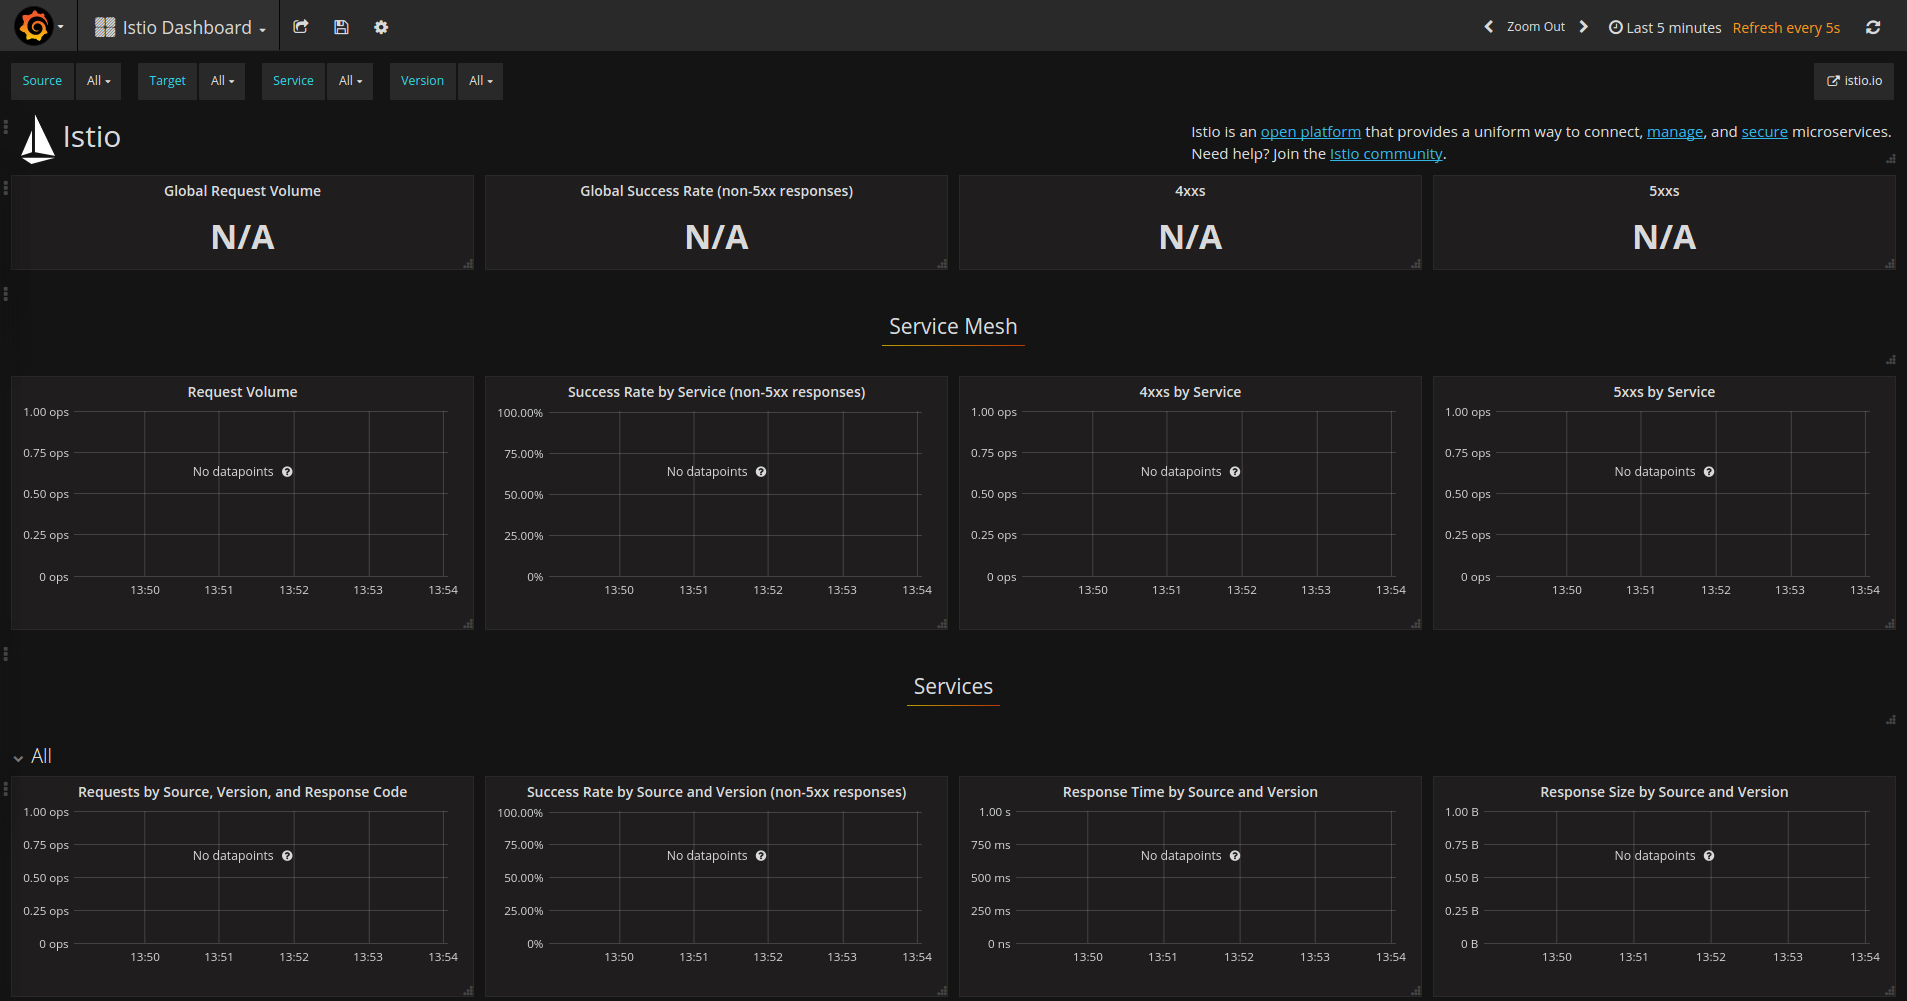
The Grafana addon provides an Istio dashboard visualization of the metrics (request rates, success/failure rates) in the cluster. Once you’ve installed Grafana, check that you can access the dashboard.
Configure port-forwarding for the grafana service, as follows:
kubectl port-forward $(kubectl get pod -l app=grafana -o jsonpath='{.items[0].metadata.name}') 3000:3000 &
Then point your web browser to http://localhost:3000/dashboard/db/istio-dashboard. The dashboard should look something like this:

Verifying the ServiceGraph service
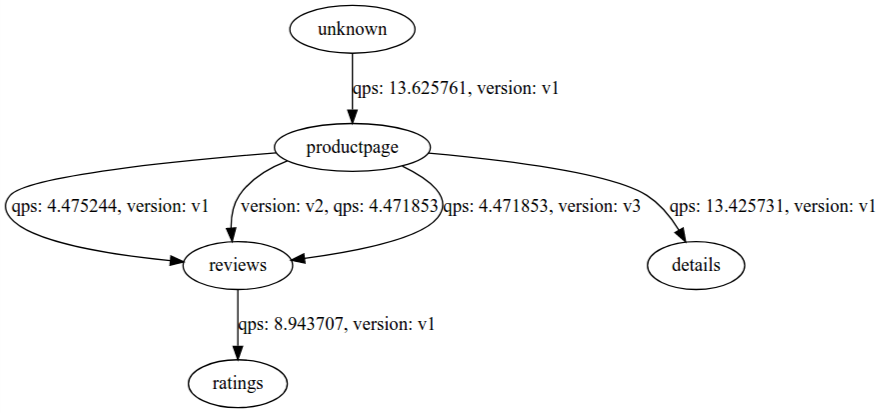
The ServiceGraph addon provides a textual (JSON) representation and a graphical visualization of the service interaction graph for the cluster. Like Grafana, you can access the servicegraph service using port-forwarding, service nodePort, or (if external load balancing is available) external IP. In this case the service name is servicegraph and the port to access is 8088:
kubectl port-forward $(kubectl get pod -l app=servicegraph -o jsonpath='{.items[0].metadata.name}') 8088:8088 &
The ServiceGraph service provides both a textual (JSON) representation (via /graph) and a graphical visualization (via /dotviz) of the underlying service graph. To view the graphical visualization (assuming that you have configured port forwarding as per the previous snippet), open your browser at: http://localhost:8088/dotviz.
After running some services – for example, after installing the BookInfo sample application and generating some load on the application (e.g., executing curl requests in a while loop) – the resulting service graph should look something like this:

Enabling request tracing with Zipkin
To enable and view distributed request tracing, install the Zipkin addon:
kubectl apply -f install/kubernetes/addons/zipkin.yaml
Zipkin can be used to analyze the request flow and timing of an Istio application and to help identify bottlenecks. You can find out more about how to access the Zipkin dashboard and use Zipkin in Distributed Request Tracing.
Verifying the installation
Ensure the following Kubernetes services were deployed: “istio-pilot”, “istio-mixer”, “istio-ingress”, “istio-egress”, “istio-ca” (if Istio Auth is enabled), and, optionally, “grafana”, “prometheus’, “servicegraph” and “zipkin”.
kubectl get svcNAME CLUSTER-IP EXTERNAL-IP PORT(S) AGE grafana 10.83.252.16 <none> 3000:30432/TCP 5h istio-egress 10.83.247.89 <none> 80/TCP 5h istio-ingress 10.83.245.171 35.184.245.62 80:32730/TCP,443:30574/TCP 5h istio-pilot 10.83.251.173 <none> 8080/TCP,8081/TCP 5h istio-mixer 10.83.244.253 <none> 9091/TCP,9094/TCP,42422/TCP 5h kubernetes 10.83.240.1 <none> 443/TCP 36d prometheus 10.83.247.221 <none> 9090:30398/TCP 5h servicegraph 10.83.242.48 <none> 8088:31928/TCP 5h zipkin 10.83.241.77 <none> 9411:30243/TCP 5hNote that if your cluster is running in an environment that does not support an external load balancer (e.g., minikube), the
EXTERNAL-IPofistio-ingresswill say<pending>and you will need to access the application using the service NodePort or port-forwarding instead.Check the corresponding Kubernetes pods were deployed and all containers are up and running: “istio-pilot-*”, “istio-mixer-*”, “istio-ingress-*”, “istio-egress-*”, “istio-ca-*” (if Istio Auth is enabled), and, optionally, “grafana-*”, “prometheus-*’, “servicegraph-*” and “zipkin-*”.
kubectl get podsgrafana-3836448452-vhc1v 1/1 Running 0 5h istio-ca-3657790228-j21b9 1/1 Running 0 5h istio-egress-1684034556-fhw89 1/1 Running 0 5h istio-ingress-1842462111-j3vcs 1/1 Running 0 5h istio-pilot-2275554717-93c43 2/2 Running 0 5h istio-mixer-2104784889-20rm8 1/1 Running 0 5h prometheus-3067433533-wlmt2 1/1 Running 0 5h servicegraph-3127588006-pc5z3 1/1 Running 0 5h zipkin-4057566570-k9m42 1/1 Running 0 5h
Deploy your application
You can now deploy your own application, or one of the sample applications provided with the installation, for example BookInfo. Note that the application should use HTTP/1.1 or HTTP/2.0 protocol for all its HTTP traffic; HTTP/1.0 is not supported.
When deploying the application, you must use istioctl kube-inject to automatically inject Envoy containers in your application pods:
kubectl create -f <(istioctl kube-inject -f <your-app-spec>.yaml)
Uninstalling
Uninstall Istio core components:
If Istio was installed without Istio auth feature:
kubectl delete -f install/kubernetes/istio.yamlIf Istio was installed with auth feature enabled:
kubectl delete -f install/kubernetes/istio-auth.yaml
Uninstall RBAC Istio roles:
If beta version was installed:
kubectl delete -f install/kubernetes/istio-rbac-beta.yamlIf alpha version was installed:
kubectl delete -f install/kubernetes/istio-rbac-alpha.yaml
If you installed Istio addons, uninstall them:
kubectl delete -f install/kubernetes/addons/Delete Istio Kubernetes TPRs:
kubectl delete istioconfigs --all
kubectl delete thirdpartyresource istio-config.istio.io
What’s next
See the sample BookInfo application.
See how to test Istio Auth.