Visualizing Your Mesh
This task shows you how to visualize different aspects of your Istio mesh.
As part of this task, you install the Kiali add-on and use the web-based graphical user interface to view service graphs of the mesh and your Istio configuration objects. Lastly, you use the Kiali Public API to generate graph data in the form of consumable JSON.
This task uses the Bookinfo sample application as the example throughout.
Before you begin
Create a secret
Create a secret in your Istio namespace with the credentials that you use to authenticate to Kiali.
First, define the credentials you want to use as the Kiali username and passphrase.
Enter a Kiali username when prompted:
$ KIALI_USERNAME=$(read -p 'Kiali Username: ' uval && echo -n $uval | base64)
Enter a Kiali passphrase when prompted:
$ KIALI_PASSPHRASE=$(read -sp 'Kiali Passphrase: ' pval && echo -n $pval | base64)
If you are using the Z Shell, zsh, use the following to define the credentials:
$ KIALI_USERNAME=$(read '?Kiali Username: ' uval && echo -n $uval | base64)
$ KIALI_PASSPHRASE=$(read -s "?Kiali Passphrase: " pval && echo -n $pval | base64)
To create a secret, run the following commands:
$ NAMESPACE=istio-system
$ kubectl create namespace $NAMESPACE
$ cat <<EOF | kubectl apply -f -
apiVersion: v1
kind: Secret
metadata:
  name: kiali
  namespace: $NAMESPACE
  labels:
    app: kiali
type: Opaque
data:
  username: $KIALI_USERNAME
  passphrase: $KIALI_PASSPHRASE
EOF
Install via istioctl
Once you create the Kiali secret, follow
the install instructions to install Kiali via istioctl.
For example:
$ istioctl manifest apply --set values.kiali.enabled=true
Once you install Istio and Kiali, deploy the Bookinfo sample application.
Running on OpenShift
When Kiali runs on OpenShift it needs access to some OpenShift specific resources in order to function properly, which can be done using the following commands after Kiali has been installed:
$ oc patch clusterrole kiali -p '[{"op":"add", "path":"/rules/-", "value":{"apiGroups":["apps.openshift.io"], "resources":["deploymentconfigs"],"verbs": ["get", "list", "watch"]}}]' --type json
$ oc patch clusterrole kiali -p '[{"op":"add", "path":"/rules/-", "value":{"apiGroups":["project.openshift.io"], "resources":["projects"],"verbs": ["get"]}}]' --type json
$ oc patch clusterrole kiali -p '[{"op":"add", "path":"/rules/-", "value":{"apiGroups":["route.openshift.io"], "resources":["routes"],"verbs": ["get"]}}]' --type json
Generating a service graph
To verify the service is running in your cluster, run the following command:
$ kubectl -n istio-system get svc kialiTo determine the Bookinfo URL, follow the instructions to determine the Bookinfo ingress
GATEWAY_URL.To send traffic to the mesh, you have three options
Visit
http://$GATEWAY_URL/productpagein your web browserUse the following command multiple times:
$ curl http://$GATEWAY_URL/productpageIf you installed the
watchcommand in your system, send requests continually with:$ watch -n 1 curl -o /dev/null -s -w %{http_code} $GATEWAY_URL/productpage
To open the Kiali UI, execute the following command in your Kubernetes environment:
$ istioctl dashboard kialiTo log into the Kiali UI, go to the Kiali login screen and enter the username and passphrase stored in the Kiali secret.
View the overview of your mesh in the Overview page that appears immediately after you log in. The Overview page displays all the namespaces that have services in your mesh. The following screenshot shows a similar page:
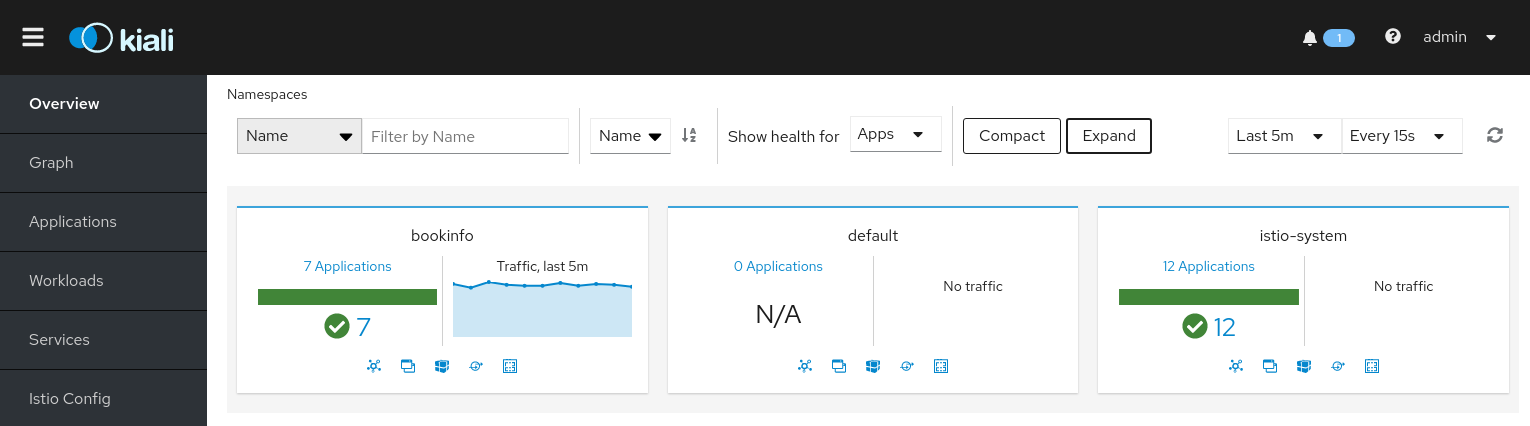
Example Overview To view a namespace graph, click on the
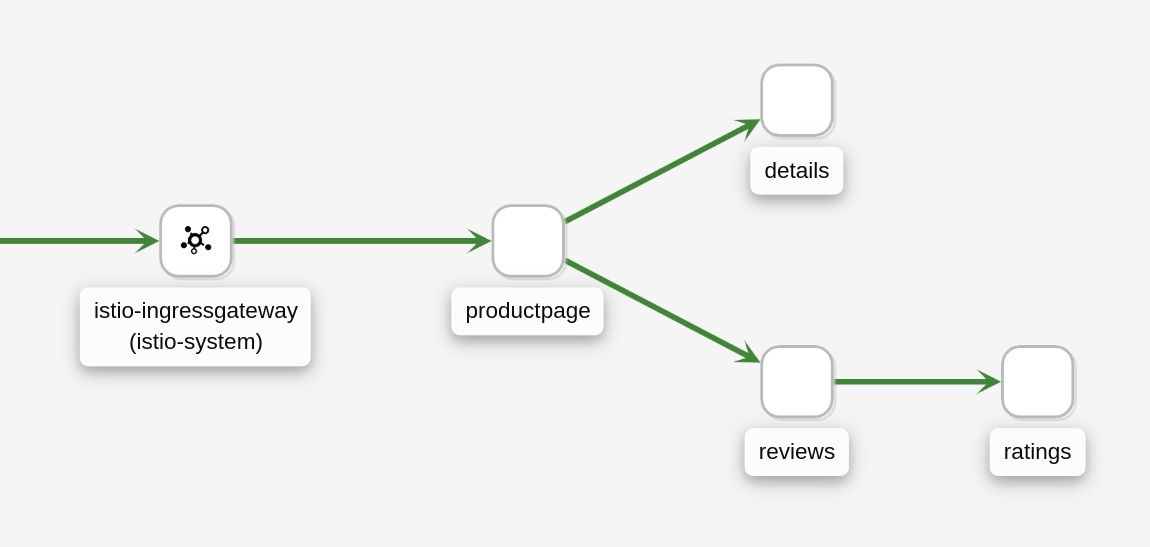
bookinfograph icon in the Bookinfo namespace card. The graph icon is in the lower left of the namespace card and looks like a connected group of circles. The page looks similar to:
Example Graph To view a summary of metrics, select any node or edge in the graph to display its metric details in the summary details panel on the right.
To view your service mesh using different graph types, select a graph type from the Graph Type drop down menu. There are several graph types to choose from: App, Versioned App, Workload, Service.
The App graph type aggregates all versions of an app into a single graph node. The following example shows a single reviews node representing the three versions of the reviews app.
Example App Graph The Versioned App graph type shows a node for each version of an app, but all versions of a particular app are grouped together. The following example shows the reviews group box that contains the three nodes that represents the three versions of the reviews app.
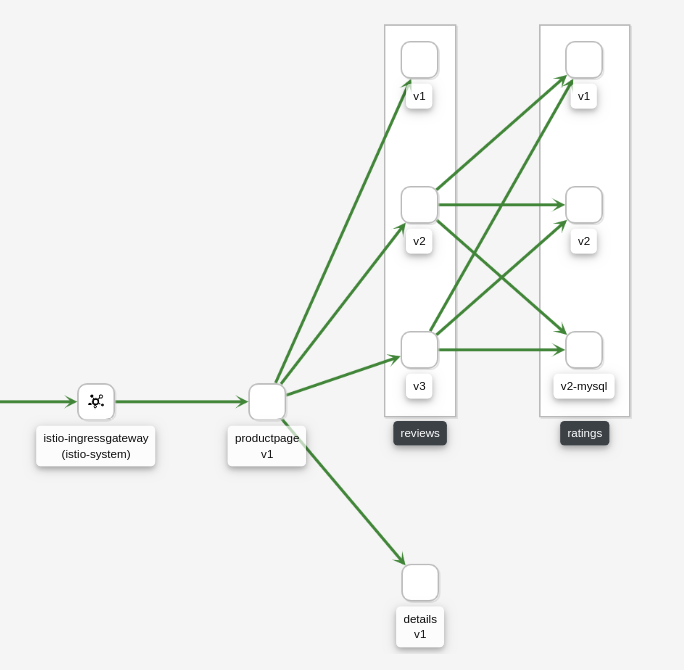
Example Versioned App Graph The Workload graph type shows a node for each workload in your service mesh. This graph type does not require you to use the
appandversionlabels so if you opt to not use those labels on your components, this is the graph type you will use.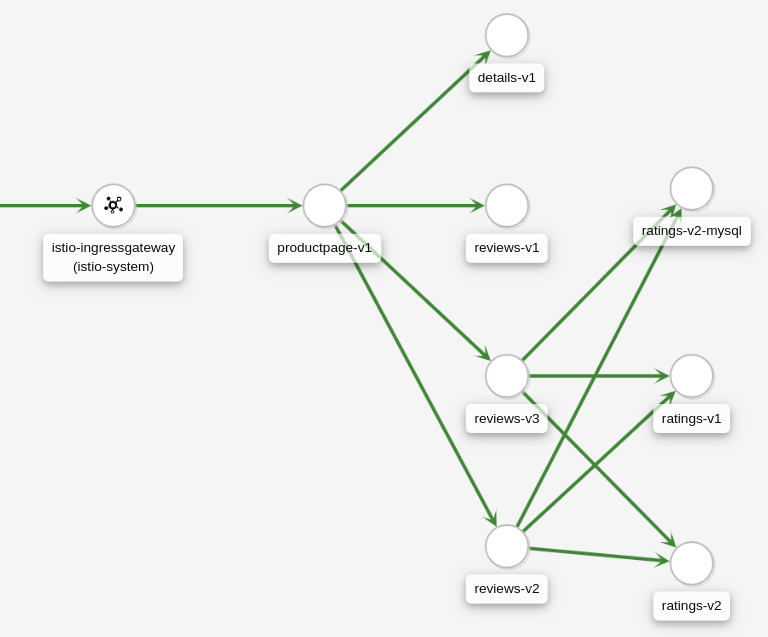
Example Workload Graph The Service graph type shows a node for each service in your mesh but excludes all apps and workloads from the graph.
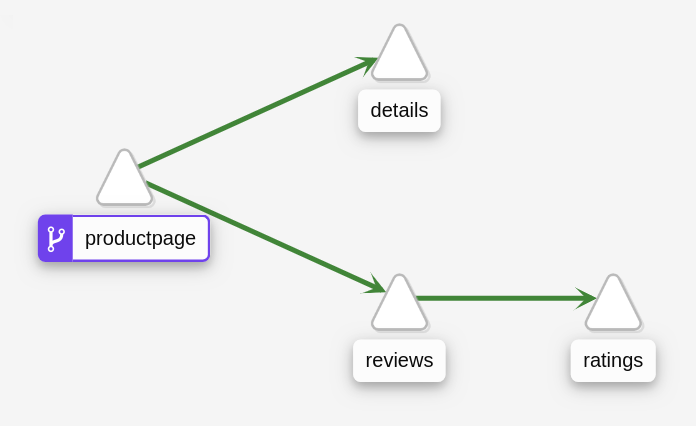
Example Service Graph
Examining Istio configuration
To view detailed information about Istio configuration, click on the Applications, Workloads, and Services menu icons on the left menu bar. The following screenshot shows information for the Bookinfo application:
Example Details
Creating weighted routes
You can use the Kiali weighted routing wizard to define the specific percentage of request traffic to route to two or more workloads.
View the Versioned app graph of the
bookinfograph.Make sure you have selected Requests percentage in the Edge Labels drop down menu to see the percentage of traffic routed to each workload.
Make sure you have selected the Service Nodes check box in the Display drop down menu to view the service nodes in the graph.
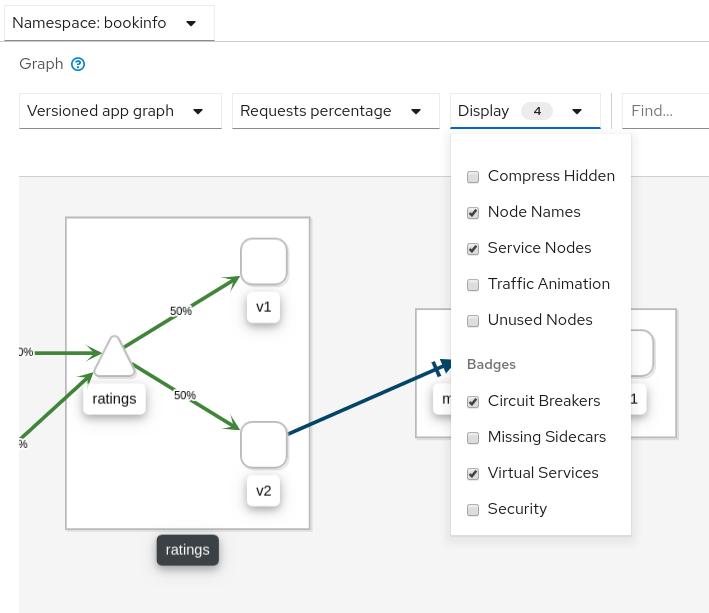
Bookinfo Graph Options Focus on the
ratingsservice within thebookinfograph by clicking on theratingsservice (triangle) node. Notice theratingsservice traffic is evenly distributed to the tworatingsworkloadsv1andv2(50% of requests are routed to each workload).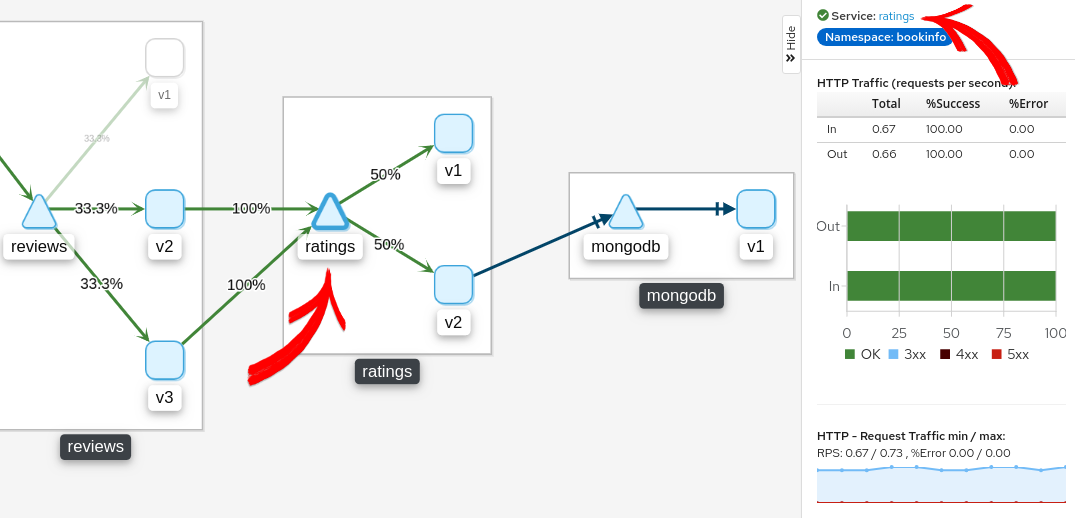
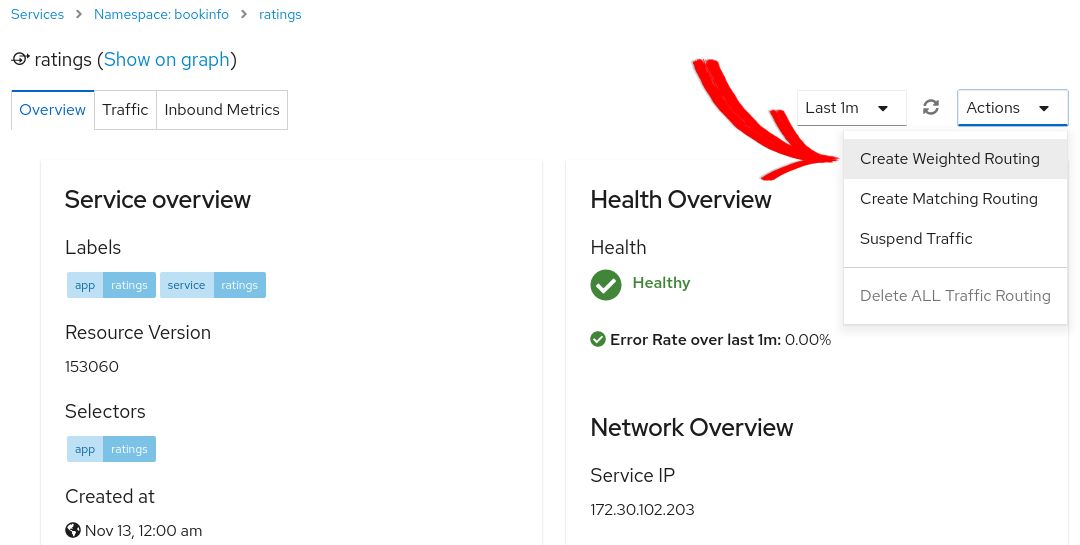
Graph Showing Percentage of Traffic Click the ratings link found in the side panel to go to the service view for the
ratingsservice.From the Action drop down menu, select Create Weighted Routing to access the weighted routing wizard.
Service Action Menu Drag the sliders to specify the percentage of traffic to route to each workload. For
ratings-v1, set it to 10%; forratings-v2set it to 90%.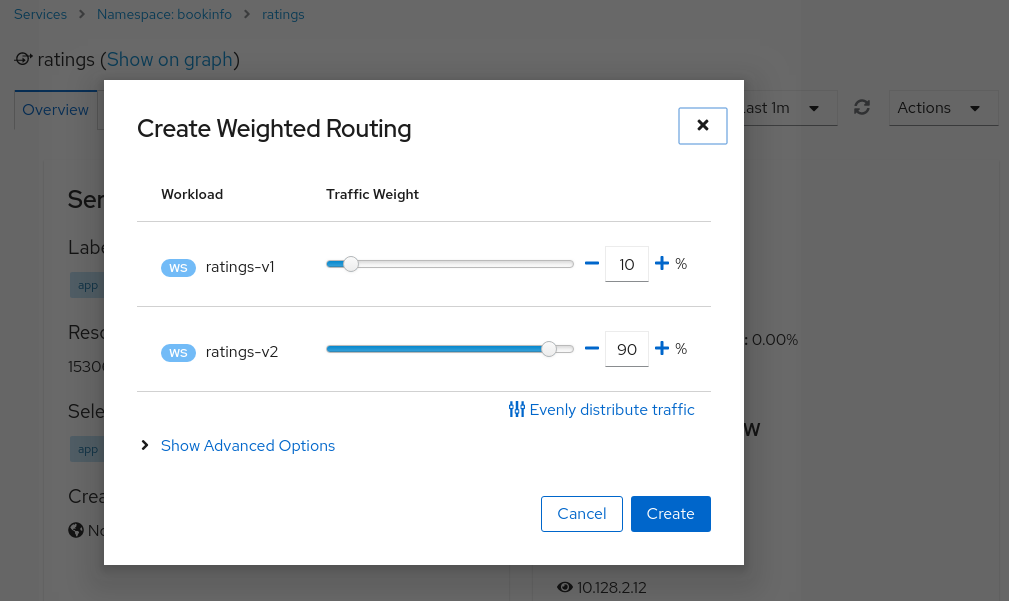
Weighted Routing Wizard Click the Create button to create the new routing.
Click Graph in the left hand navigation bar to return to the
bookinfograph.Send requests to the
bookinfoapplication. For example, to send one request per second, you can execute this command if you havewatchinstalled on your system:$ watch -n 1 curl -o /dev/null -s -w %{http_code} $GATEWAY_URL/productpageAfter a few minutes you will notice that the traffic percentage will reflect the new traffic route, thus confirming the fact that your new traffic route is successfully routing 90% of all traffic requests to
ratings-v2.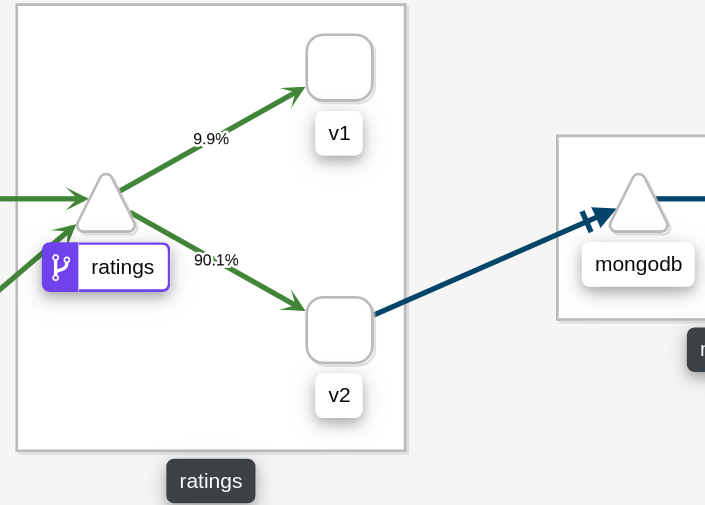
90% Ratings Traffic Routed to ratings-v2
Validating Istio configuration
Kiali can validate your Istio resources to ensure they follow proper conventions and semantics. Any problems detected in the configuration of your Istio resources can be flagged as errors or warnings depending on the severity of the incorrect configuration. See the Kiali validations page for the list of all validation checks Kiali performs.
Force an invalid configuration of a service port name to see how Kiali reports a validation error.
Change the port name of the
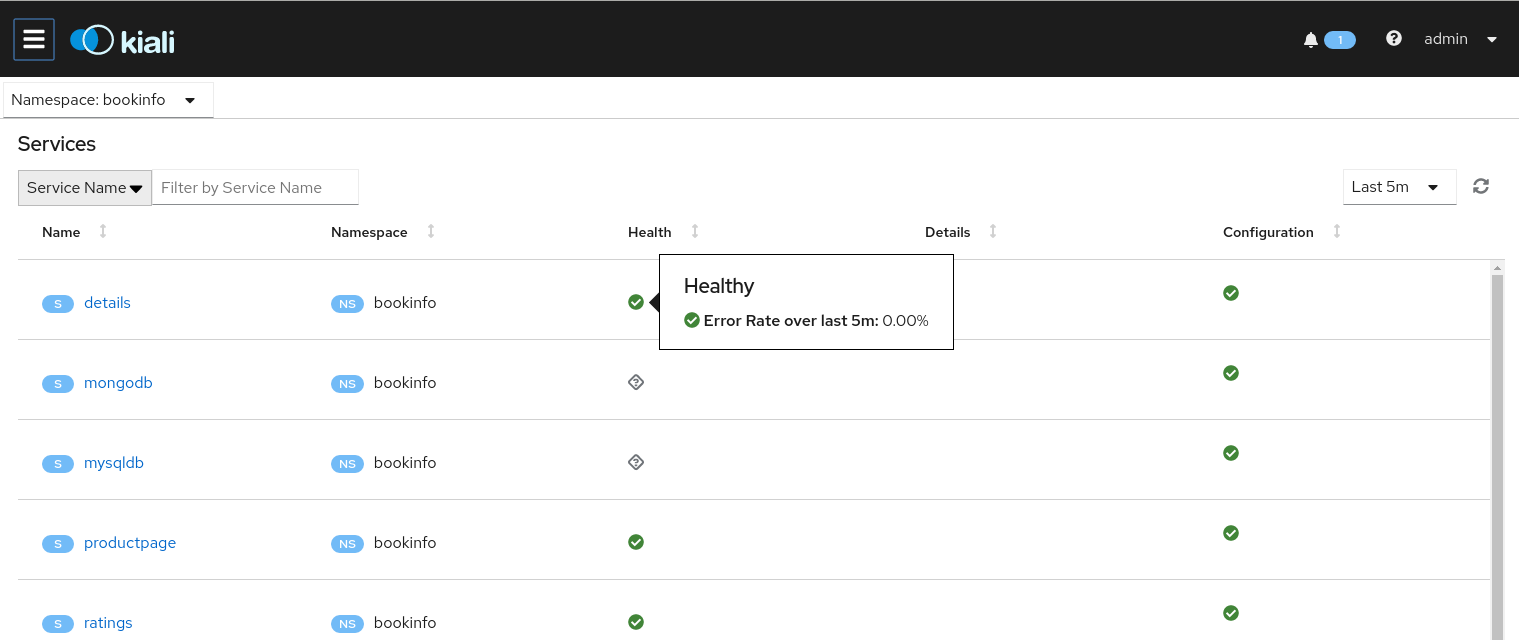
detailsservice fromhttptofoo:$ kubectl patch service details -n bookinfo --type json -p '[{"op":"replace","path":"/spec/ports/0/name", "value":"foo"}]'Navigate to the Services list by clicking Services on the left hand navigation bar.
Select
bookinfofrom the Namespace drop down menu if it is not already selected.Notice the error icon displayed in the Configuration column of the
detailsrow.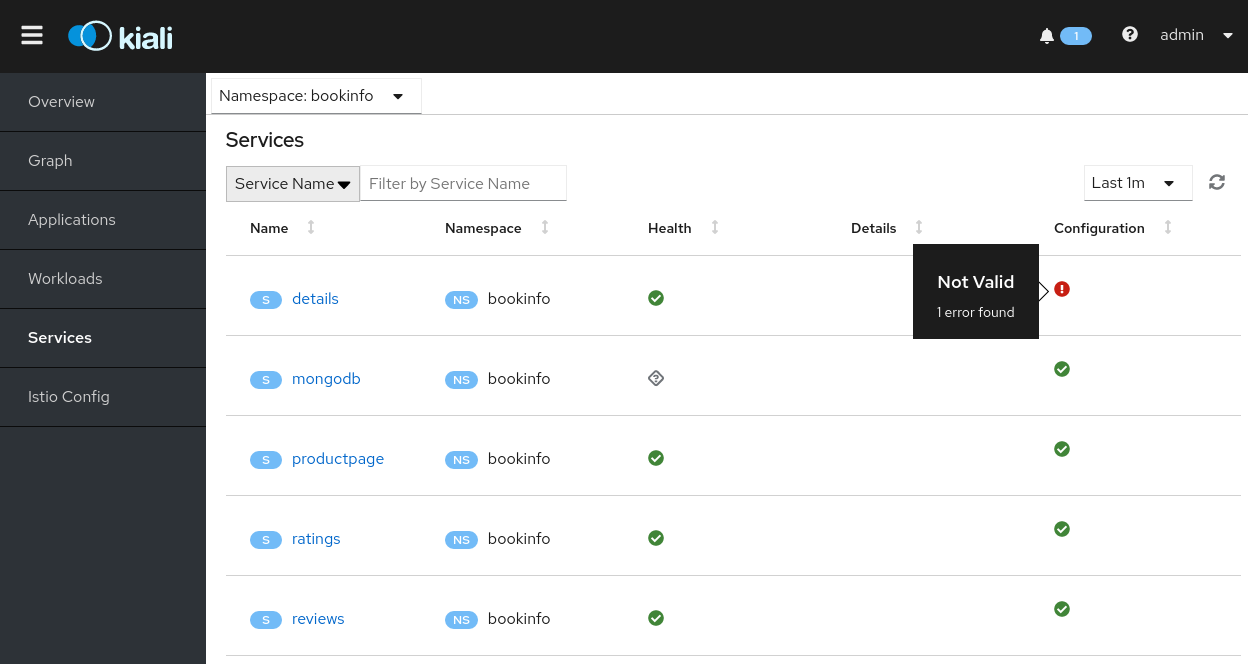
Services List Showing Invalid Configuration Click the details link in the Name column to navigate to the service details view.
Hover over the error icon to display a tool tip describing the error.
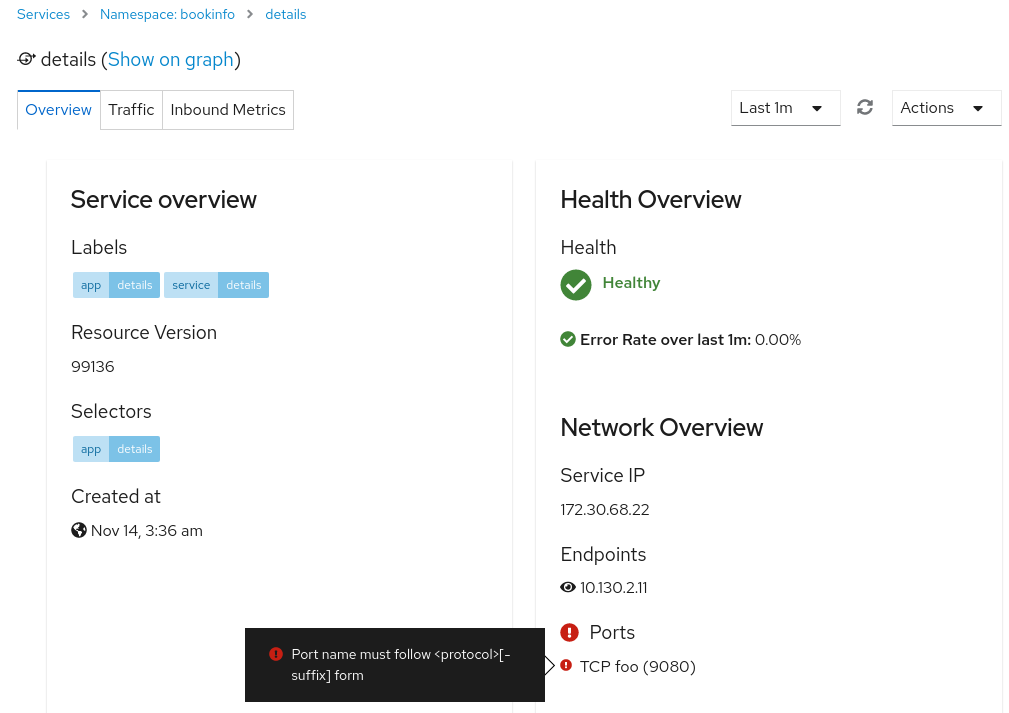
Service Details Describing the Invalid Configuration Change the port name back to
httpto correct the configuration and returnbookinfoback to its normal state.$ kubectl patch service details -n bookinfo --type json -p '[{"op":"replace","path":"/spec/ports/0/name", "value":"http"}]'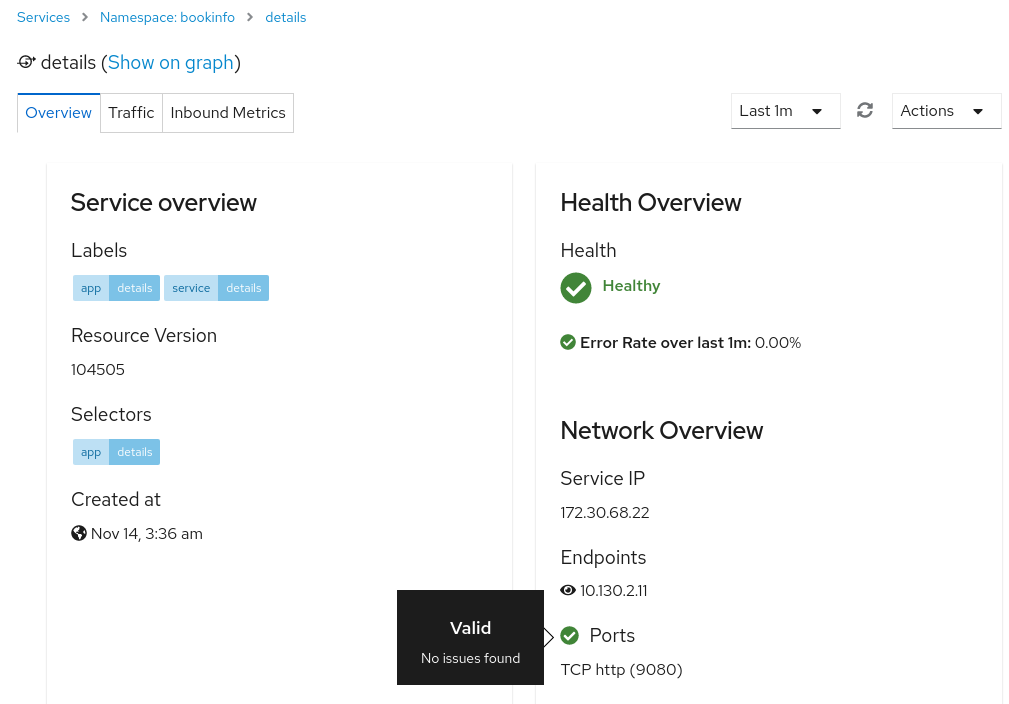
Service Details Showing Valid Configuration
Viewing and editing Istio configuration YAML
Kiali provides a YAML editor for viewing and editing Istio configuration resources. The YAML editor will also provide validation messages when it detects incorrect configurations.
Create Bookinfo destination rules:
$ kubectl apply -f @samples/bookinfo/networking/destination-rule-all.yaml@Click
Istio Configon the left hand navigation bar to navigate to the Istio configuration list.Select
bookinfofrom the Namespace drop down menu if it is not already selected.Notice the error messages and the error and warning icons that alert you to several configuration problems.
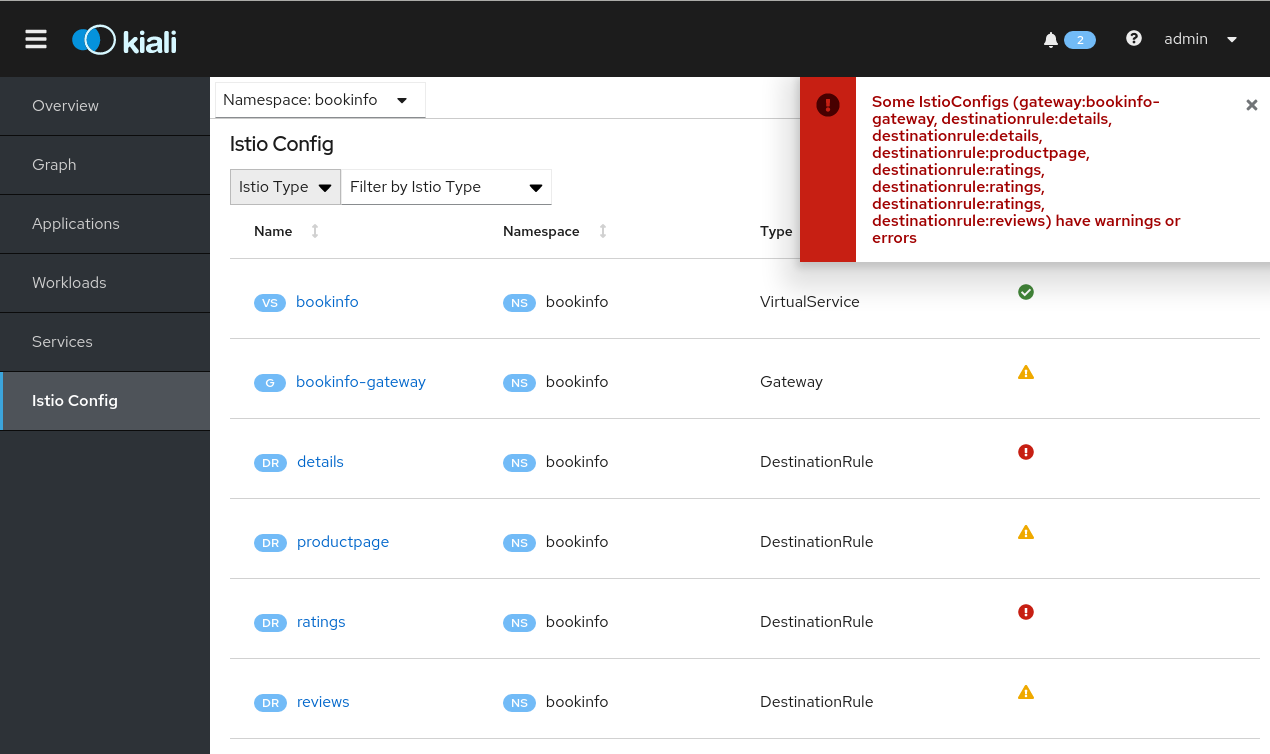
Istio Config List Incorrect Configuration Messages Hover over the error icon in the Configuration column of the
detailsrow to see additional messages.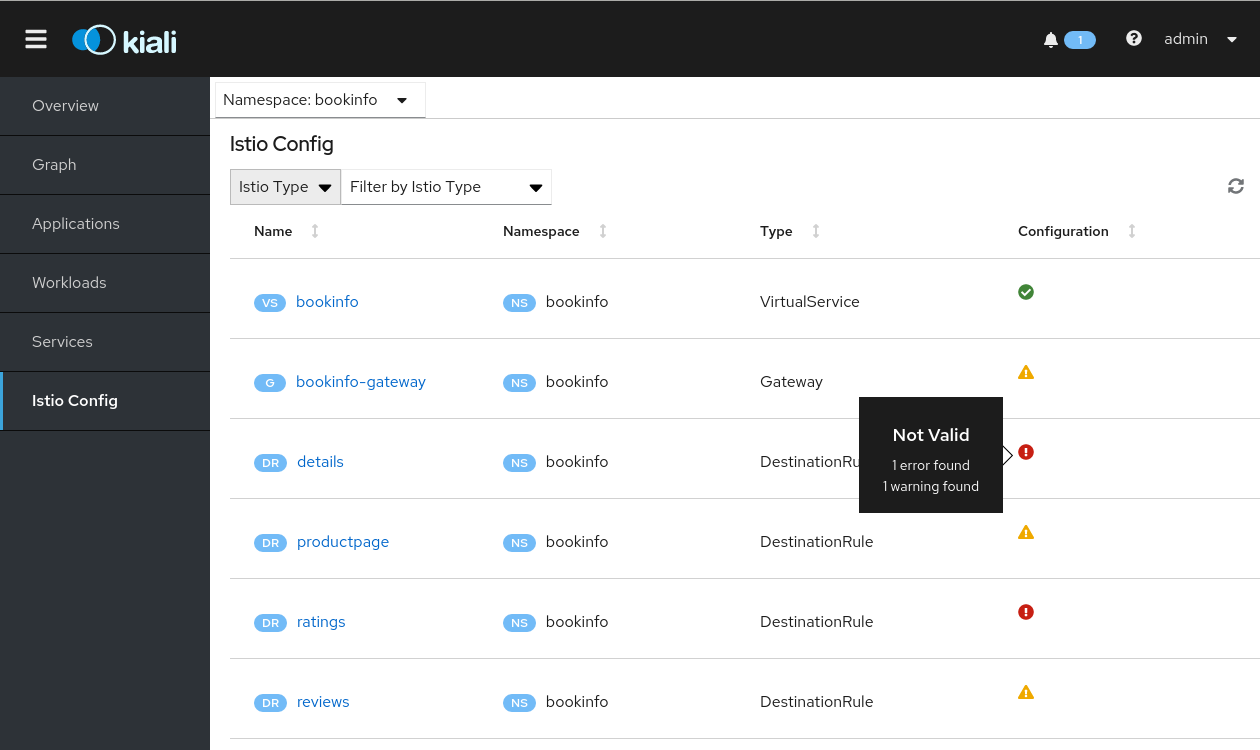
Istio Config List Incorrect Configuration Tool Tips Click the details link in the Name column to navigate to the
detailsdestination rule view.Notice the messages and icons that alert you to several validation rules that failed.
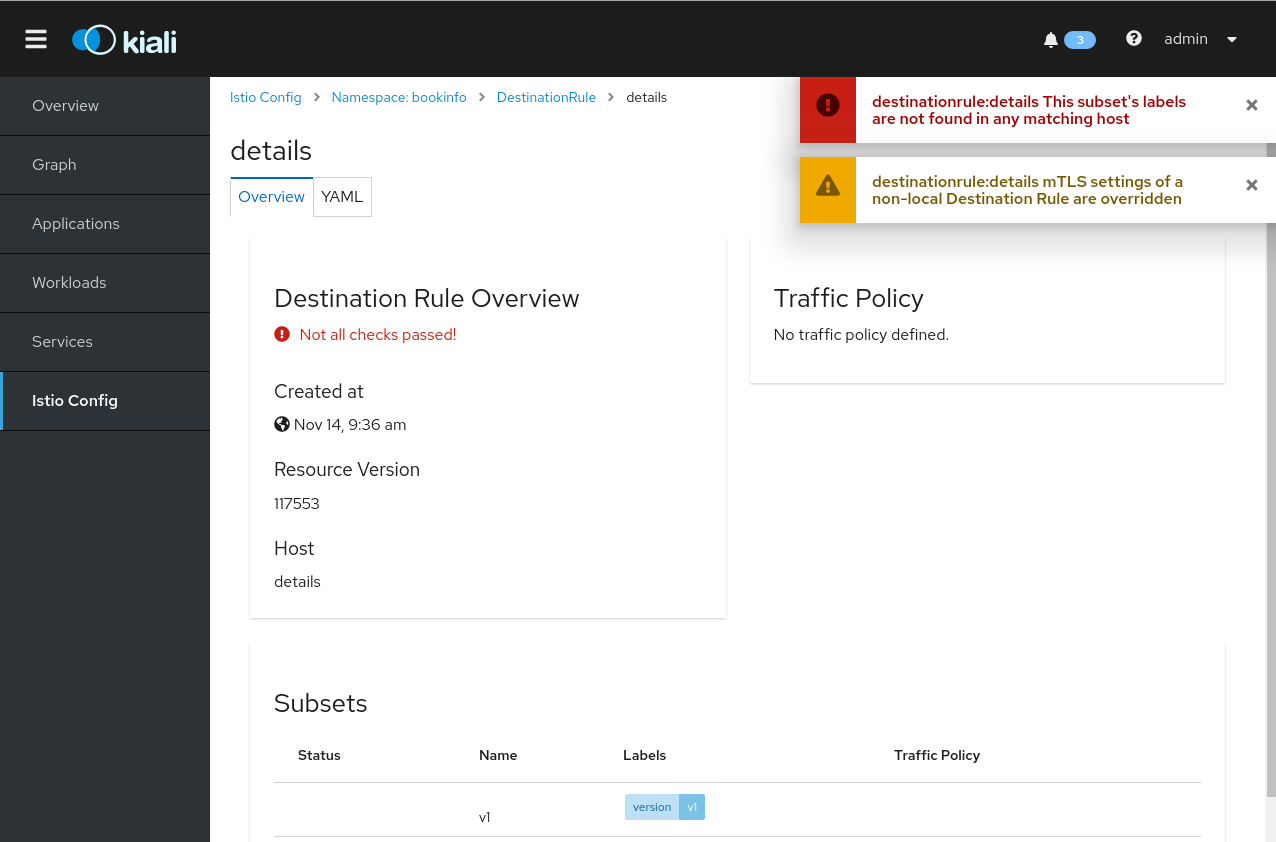
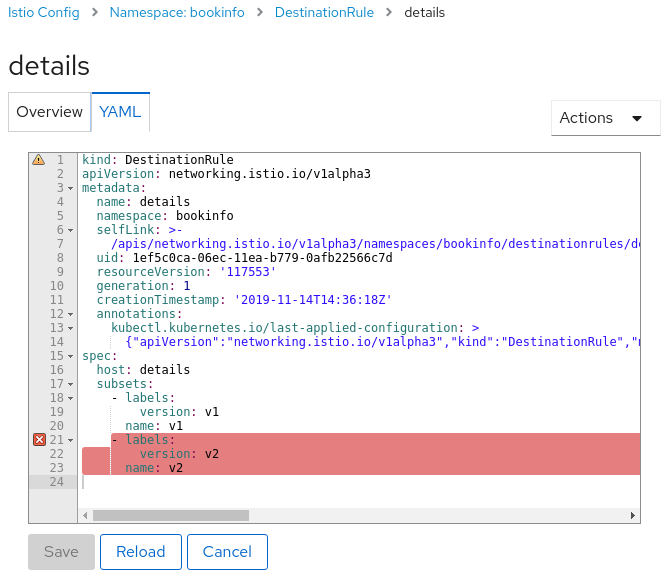
Istio Configuration Details View Showing Errors Click the YAML tab to view the YAML for this Istio destination rule resource.
Notice the color highlights and icons on the rows that have failed validation checks.
YAML Editor Showing Validation Errors and Warnings Hover over the yellow icon to view the tool tip message that informs you of the validation check that triggered the warning. For more details on the cause of the warning and how to resolve it, look up the validation warning message on the Kiali Validations page.
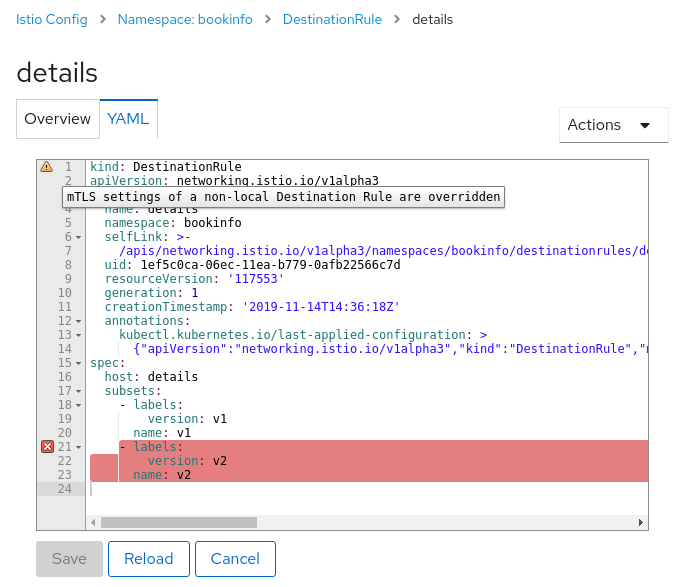
YAML Editor Showing Warning Tool Tip Hover over the red icon to view the tool tip message that informs you of the validation check that triggered the error. For more details on the cause of the error and how to resolve it, look up the validation error message on the Kiali Validations page.
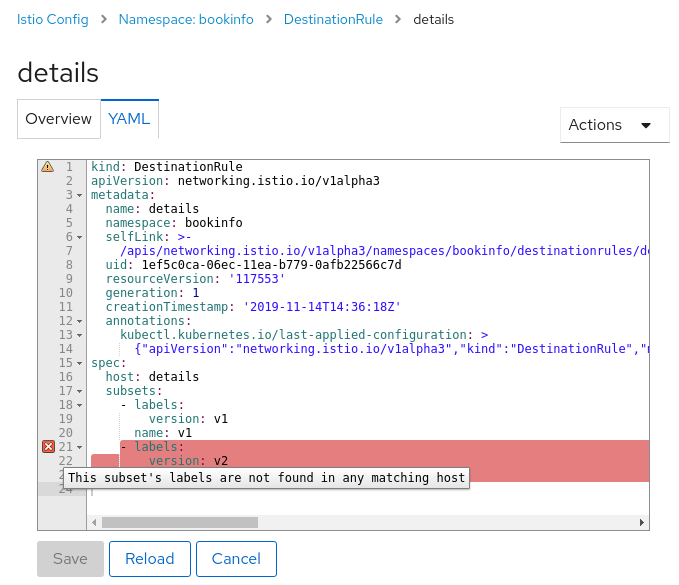
YAML Editor Showing Error Tool Tip Delete the destination rules to return
bookinfoback to its original state.$ kubectl delete -f samples/bookinfo/networking/destination-rule-all.yaml
About the Kiali Public API
To generate JSON files representing the graphs and other metrics, health, and
configuration information, you can access the
Kiali Public API.
For example, point your browser to $KIALI_URL/api/namespaces/graph?namespaces=bookinfo&graphType=app
to get the JSON representation of your graph using the app graph type.
The Kiali Public API is built on top of Prometheus queries and depends on the
standard Istio metric configuration. It also makes Kubernetes API calls to
obtain additional details about your services. For the best experience using
Kiali, use the metadata labels app and version on your application
components. As a template, the Bookinfo sample application follows this
convention.
Cleanup
If you are not planning any follow-up tasks, remove the Bookinfo sample application and Kiali from your cluster.
To remove the Bookinfo application, refer to the Bookinfo cleanup instructions.
To remove Kiali from a Kubernetes environment, remove all components with the
app=kialilabel:
$ kubectl delete all,secrets,sa,configmaps,deployments,ingresses,clusterroles,clusterrolebindings,customresourcedefinitions --selector=app=kiali -n istio-system