Declarative WebAssembly deployment for Istio
Configuring Wasm extensions for Envoy and Istio declaratively.
As outlined in the Istio 2020 trade winds blog and more recently announced with Istio 1.5, WebAssembly (Wasm) is now an (alpha) option for extending the functionality of the Istio service proxy (Envoy proxy). With Wasm, users can build support for new protocols, custom metrics, loggers, and other filters. Working closely with Google, we in the community (Solo.io) have focused on the user experience of building, socializing, and deploying Wasm extensions to Istio. We’ve announced WebAssembly Hub and associated tooling to build a “docker-like” experience for working with Wasm.
Background
With the WebAssembly Hub tooling, we can use the wasme CLI to easily bootstrap a Wasm project for Envoy, push it to a repository, and then pull/deploy it to Istio. For example, to deploy a Wasm extension to Istio with wasme we can run the following:
$  wasme deploy istio webassemblyhub.io/ceposta/demo-add-header:v0.2 \
  --id=myfilter \
  --namespace=bookinfo \
  --config 'tomorrow'
This will add the demo-add-header extension to all workloads running in the bookinfo namespace. We can get more fine-grained control over which workloads get the extension by using the --labels parameter:
$  wasme deploy istio webassemblyhub.io/ceposta/demo-add-header:v0.2 \
  --id=myfilter  \
  --namespace=bookinfo  \
  --config 'tomorrow' \
  --labels app=details
This is a much easier experience than manually creating EnvoyFilter resources and trying to get the Wasm module to each of the pods that are part of the workload you’re trying to target. However, this is a very imperative approach to interacting with Istio. Just like users typically don’t use kubectl directly in production and prefer a declarative, resource-based workflow, we want the same for making customizations to our Istio proxies.
A declarative approach
The WebAssembly Hub tooling also includes an operator for deploying Wasm extensions to Istio workloads. The operator allows users to define their WebAssembly extensions using a declarative format and leave it to the operator to rectify the deployment. For example, we use a FilterDeployment resource to define what image and workloads need the extension:
apiVersion: wasme.io/v1
kind: FilterDeployment
metadata:
  name: bookinfo-custom-filter
  namespace: bookinfo
spec:
  deployment:
    istio:
      kind: Deployment
      labels:
        app: details
  filter:
    config: 'world'
    image: webassemblyhub.io/ceposta/demo-add-header:v0.2
We could then take this FilterDeployment document and version it with the rest of our Istio resources. You may be wondering why we need this Custom Resource to configure Istio’s service proxy to use a Wasm extension when Istio already has the EnvoyFilter resource.
Let’s take a look at exactly how all of this works under the covers.
How it works
Under the covers the operator is doing a few things that aid in deploying and configuring a Wasm extension into the Istio service proxy (Envoy Proxy).
- Set up local cache of Wasm extensions
- Pull desired Wasm extension into the local cache
- Mount the
wasm-cacheinto appropriate workloads - Configure Envoy with
EnvoyFilterCRD to use the Wasm filter
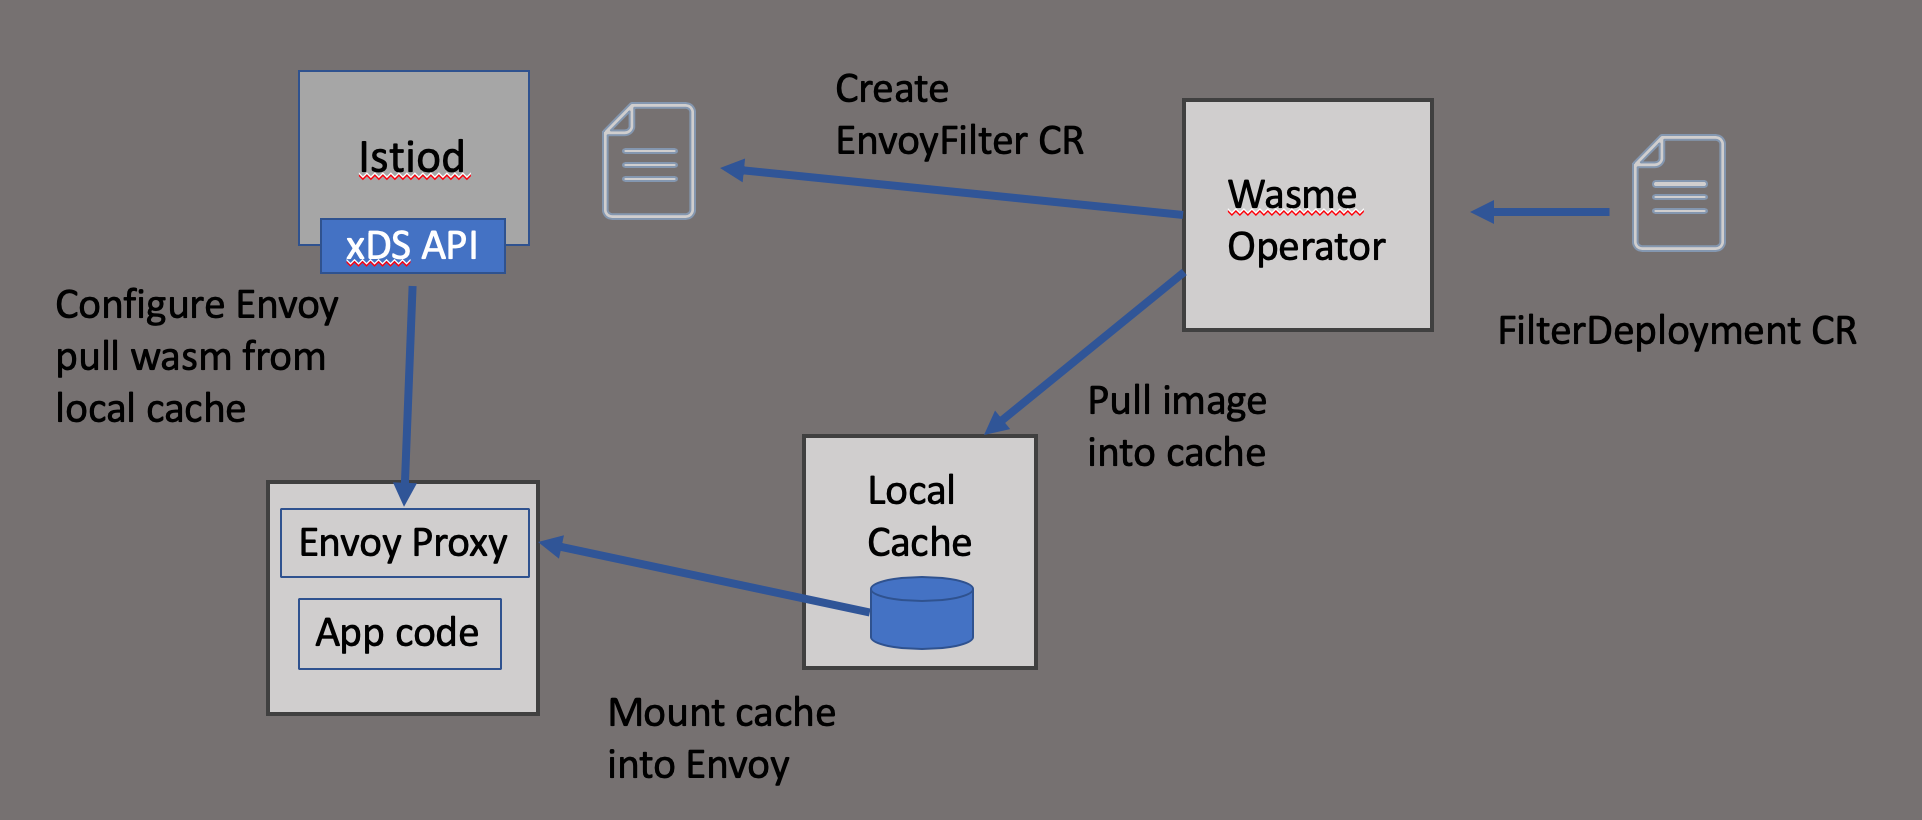
At the moment, the Wasm image needs to be published into a registry for the operator to correctly cache it. The cache pods run as DaemonSet on each node so that the cache can be mounted into the Envoy container. This is being improved, as it’s not the ideal mechanism. Ideally we wouldn’t have to deal with mounting anything and could stream the module to the proxy directly over HTTP, so stay tuned for updates (should land within next few days). The mount is established by using the sidecar.istio.io/userVolume and sidecar.istio.io/userVolumeMount annotations. See the docs on Istio Resource Annotations for more about how that works.
Once the Wasm module is cached correctly and mounted into the workload’s service proxy, the operator then configures the EnvoyFilter resources.
apiVersion: networking.istio.io/v1alpha3
kind: EnvoyFilter
metadata:
  name: details-v1-myfilter
  namespace: bookinfo
spec:
  configPatches:
  - applyTo: HTTP_FILTER
    match:
      context: SIDECAR_INBOUND
      listener:
        filterChain:
          filter:
            name: envoy.http_connection_manager
            subFilter:
              name: envoy.router
    patch:
      operation: INSERT_BEFORE
      value:
        config:
          config:
            configuration: tomorrow
            name: myfilter
            rootId: add_header
            vmConfig:
              code:
                local:
                  filename: /var/local/lib/wasme-cache/44bf95b368e78fafb663020b43cf099b23fc6032814653f2f47e4d20643e7267
              runtime: envoy.wasm.runtime.v8
              vmId: myfilter
        name: envoy.filters.http.wasm
  workloadSelector:
    labels:
      app: details
      version: v1
You can see the EnvoyFilter resource configures the proxy to add the envoy.filter.http.wasm filter and load the Wasm module from the wasme-cache.
Once the Wasm extension is loaded into the Istio service proxy, it will extend the capabilities of the proxy with whatever custom code you introduced.
Next Steps
In this blog we explored options for installing Wasm extensions into Istio workloads. The easiest way to get started with WebAssembly on Istio is to use the wasme tool to bootstrap a new Wasm project with C++, AssemblyScript [or Rust coming really soon!]. For example, to set up a C++ Wasm module, you can run:
$ wasme init ./filter --language cpp --platform istio --platform-version 1.5.x
If we didn’t have the extra flags, wasme init would enter an interactive mode walking you through the correct values to choose.
Take a look at the WebAssembly Hub wasme tooling to get started with Wasm on Istio.
Learn more
Redefine Extensibility with WebAssembly on Envoy and Istio
WebAssembly SF talk (video): Extensions for network proxies, by John Plevyak
Videos on the Solo.io Youtube Channel