Security
Breaking down a monolithic application into atomic services offers various benefits, including better agility, better scalability and better ability to reuse services. However, microservices also have particular security needs:
- To defend against man-in-the-middle attacks, they need traffic encryption.
- To provide flexible service access control, they need mutual TLS and fine-grained access policies.
- To determine who did what at what time, they need auditing tools.
Istio Security provides a comprehensive security solution to solve these issues. This page gives an overview on how you can use Istio security features to secure your services, wherever you run them. In particular, Istio security mitigates both insider and external threats against your data, endpoints, communication, and platform.

The Istio security features provide strong identity, powerful policy, transparent TLS encryption, and authentication, authorization and audit (AAA) tools to protect your services and data. The goals of Istio security are:
- Security by default: no changes needed to application code and infrastructure
- Defense in depth: integrate with existing security systems to provide multiple layers of defense
- Zero-trust network: build security solutions on distrusted networks
Visit our mutual TLS Migration docs to start using Istio security features with your deployed services. Visit our Security Tasks for detailed instructions to use the security features.
High-level architecture
Security in Istio involves multiple components:
- A Certificate Authority (CA) for key and certificate management
The configuration API server distributes to the proxies:
Sidecar and perimeter proxies work as Policy Enforcement Points (PEPs) to secure communication between clients and servers.
A set of Envoy proxy extensions to manage telemetry and auditing
The control plane handles configuration from the API server and configures the PEPs in the data plane. The PEPs are implemented using Envoy. The following diagram shows the architecture.

In the following sections, we introduce the Istio security features in detail.
Istio identity
Identity is a fundamental concept of any security infrastructure. At the beginning of a workload-to-workload communication, the two parties must exchange credentials with their identity information for mutual authentication purposes. On the client side, the server’s identity is checked against the secure naming information to see if it is an authorized runner of the workload. On the server side, the server can determine what information the client can access based on the authorization policies, audit who accessed what at what time, charge clients based on the workloads they used, and reject any clients who failed to pay their bill from accessing the workloads.
The Istio identity model uses the first-class service identity to
determine the identity of a request’s origin. This model allows for great
flexibility and granularity for service identities to represent a human user, an
individual workload, or a group of workloads. On platforms without a service
identity, Istio can use other identities that can group workload
instances, such as service names.
The following list shows examples of service identities that you can use on different platforms:
- Kubernetes: Kubernetes service account
- GCE: GCP service account
- On-premises (non-Kubernetes): user account, custom service account, service name, Istio service account, or GCP service account. The custom service account refers to the existing service account just like the identities that the customer’s Identity Directory manages.
Identity and certificate management
Istio securely provisions strong identities
to every workload with X.509 certificates. Istio agents, running alongside each Envoy proxy,
work together with istiod to automate key and certificate
rotation at scale. The following diagram shows the identity
provisioning flow.

Istio provisions keys and certificates through the following flow:
istiodoffers a gRPC service to take certificate signing requests (CSRs).- When started, the Istio agent creates the private key
and CSR, and then sends the CSR with its credentials to
istiodfor signing. - The CA in
istiodvalidates the credentials carried in the CSR. Upon successful validation, it signs the CSR to generate the certificate. - When a workload is started, Envoy requests the certificate and key from the Istio agent in the same container via the Envoy secret discovery service (SDS) API.
- The Istio agent sends the certificates received from
istiodand the private key to Envoy via the Envoy SDS API. - Istio agent monitors the expiration of the workload certificate. The above process repeats periodically for certificate and key rotation.
Authentication
Istio provides two types of authentication:
Peer authentication: used for service-to-service authentication to verify the client making the connection. Istio offers mutual TLS as a full stack solution for transport authentication, which can be enabled without requiring service code changes. This solution:
- Provides each service with a strong identity representing its role to enable interoperability across clusters and clouds.
- Secures service-to-service communication.
- Provides a key management system to automate key and certificate generation, distribution, and rotation.
Request authentication: Used for end-user authentication to verify the credential attached to the request. Istio enables request-level authentication with JSON Web Token (JWT) validation and a streamlined developer experience using a custom authentication provider or any OpenID Connect providers, for example:
In all cases, Istio stores the authentication policies in the Istio config
store via a custom Kubernetes API. Istiod keeps them up-to-date for each proxy,
along with the keys where appropriate. Additionally, Istio supports
authentication in permissive mode to help you understand how a policy change can
affect your security posture before it is enforced.
Mutual TLS authentication
Istio tunnels service-to-service communication through the client- and server-side PEPs, which are implemented as Envoy proxies. When a workload sends a request to another workload using mutual TLS authentication, the request is handled as follows:
- Istio re-routes the outbound traffic from a client to the client’s local sidecar Envoy.
- The client side Envoy starts a mutual TLS handshake with the server side Envoy. During the handshake, the client side Envoy also does a secure naming check to verify that the service account presented in the server certificate is authorized to run the target service.
- The client side Envoy and the server side Envoy establish a mutual TLS connection, and Istio forwards the traffic from the client side Envoy to the server side Envoy.
- The server side Envoy authorizes the request. If authorized, it forwards the traffic to the backend service through local TCP connections.
Istio configures TLSv1_2 as the minimum TLS version for both client and server with
the following cipher suites:
CDHE-ECDSA-AES256-GCM-SHA384ECDHE-RSA-AES256-GCM-SHA384ECDHE-ECDSA-AES128-GCM-SHA256ECDHE-RSA-AES128-GCM-SHA256AES256-GCM-SHA384AES128-GCM-SHA256
Permissive mode
Istio mutual TLS has a permissive mode, which allows a service to accept both plaintext traffic and mutual TLS traffic at the same time. This feature greatly improves the mutual TLS onboarding experience.
Many non-Istio clients communicating with a non-Istio server presents a problem for an operator who wants to migrate that server to Istio with mutual TLS enabled. Commonly, the operator cannot install an Istio sidecar for all clients at the same time or does not even have the permissions to do so on some clients. Even after installing the Istio sidecar on the server, the operator cannot enable mutual TLS without breaking existing communications.
With the permissive mode enabled, the server accepts both plaintext and mutual TLS traffic. The mode provides greater flexibility for the on-boarding process. The server’s installed Istio sidecar takes mutual TLS traffic immediately without breaking existing plaintext traffic. As a result, the operator can gradually install and configure the client’s Istio sidecars to send mutual TLS traffic. Once the configuration of the clients is complete, the operator can configure the server to mutual TLS only mode. For more information, visit the Mutual TLS Migration tutorial.
Secure naming
Server identities are encoded in certificates, but service names are retrieved
through the discovery service or DNS. The secure naming information maps the
server identities to the service names. A mapping of identity A to service
name B means “A is authorized to run service B”. The control plane watches
the apiserver, generates the secure naming mappings, and distributes them
securely to the PEPs. The following example explains why secure naming is
critical in authentication.
Suppose the legitimate servers that run the service datastore only use the
infra-team identity. A malicious user has the certificate and key for the
test-team identity. The malicious user intends to impersonate the service to
inspect the data sent from the clients. The malicious user deploys a forged
server with the certificate and key for the test-team identity. Suppose the
malicious user successfully hijacked (through DNS spoofing, BGP/route hijacking,
ARP spoofing, etc.) the traffic sent to the datastore and redirected it to the
forged server.
When a client calls the datastore service, it extracts the test-team
identity from the server’s certificate, and checks whether test-team is
allowed to run datastore with the secure naming information. The client
detects that test-team is not allowed to run the datastore service and the
authentication fails.
Note that, for non HTTP/HTTPS traffic, secure naming doesn’t protect from DNS spoofing,
in which case the attacker modifies the destination IPs for the service.
Since TCP traffic does not contain Host information and Envoy can only
rely on the destination IP for routing, Envoy may route traffic to
services on the hijacked IPs. This DNS spoofing can happen even
before the client-side Envoy receives the traffic.
Authentication architecture
You can specify authentication requirements for workloads receiving requests in
an Istio mesh using peer and request authentication policies. The mesh operator
uses .yaml files to specify the policies. The policies are saved in the Istio
configuration storage once deployed. The Istio controller watches the
configuration storage.
Upon any policy changes, the new policy is translated to the appropriate configuration telling the PEP how to perform the required authentication mechanisms. The control plane may fetch the public key and attach it to the configuration for JWT validation. Alternatively, Istiod provides the path to the keys and certificates the Istio system manages and installs them to the application pod for mutual TLS. You can find more info in the Identity and certificate management section.
Istio sends configurations to the targeted endpoints asynchronously. Once the proxy receives the configuration, the new authentication requirement takes effect immediately on that pod.
Client services, those that send requests, are responsible for following the necessary authentication mechanism. For request authentication, the application is responsible for acquiring and attaching the JWT credential to the request. For peer authentication, Istio automatically upgrades all traffic between two PEPs to mutual TLS. If authentication policies disable mutual TLS mode, Istio continues to use plain text between PEPs. To override this behavior explicitly disable mutual TLS mode with destination rules. You can find out more about how mutual TLS works in the Mutual TLS authentication section.

Istio outputs identities with both types of authentication, as well as other claims in the credential if applicable, to the next layer: authorization.
Authentication policies
This section provides more details about how Istio authentication policies work.
As you’ll remember from the
Architecture section,
authentication policies apply to requests that a service receives. To specify
client-side authentication rules in mutual TLS, you need to specify the
TLSSettings in the DestinationRule. You can find more information in our
TLS settings reference docs.
Like other Istio configurations, you can specify authentication policies in
.yaml files. You deploy policies using kubectl.
The following example authentication policy specifies that transport
authentication for the workloads with the app:reviews label must use mutual
TLS:
apiVersion: security.istio.io/v1beta1
kind: PeerAuthentication
metadata:
  name: "example-peer-policy"
  namespace: "foo"
spec:
  selector:
    matchLabels:
      app: reviews
  mtls:
    mode: STRICT
Policy storage
Istio stores mesh-scope policies in the root namespace. These policies have an
empty selector apply to all workloads in the mesh. Policies that have a
namespace scope are stored in the corresponding namespace. They only apply to
workloads within their namespace. If you configure a selector field, the
authentication policy only applies to workloads matching the conditions you
configured.
Peer and request authentication policies are stored separately by kind,
PeerAuthentication and RequestAuthentication respectively.
Selector field
Peer and request authentication policies use selector fields to specify the
label of the workloads to which the policy applies. The following example shows
the selector field of a policy that applies to workloads with the
app:product-page label:
selector:
  matchLabels:
    app: product-page
If you don’t provide a value for the selector field, Istio matches the policy
to all workloads in the storage scope of the policy. Thus, the selector fields
help you specify the scope of the policies:
- Mesh-wide policy: A policy specified for the root namespace without or
with an empty
selectorfield. - Namespace-wide policy: A policy specified for a non-root namespace without
or with an empty
selectorfield. - Workload-specific policy: a policy defined in the regular namespace, with non-empty selector field.
Peer and request authentication policies follow the same hierarchy principles
for the selector fields, but Istio combines and applies them in slightly
different ways.
There can be only one mesh-wide peer authentication policy, and only one namespace-wide peer authentication policy per namespace. When you configure multiple mesh- or namespace-wide peer authentication policies for the same mesh or namespace, Istio ignores the newer policies. When more than one workload-specific peer authentication policy matches, Istio picks the oldest one.
Istio applies the narrowest matching policy for each workload using the following order:
- workload-specific
- namespace-wide
- mesh-wide
Istio can combine all matching request authentication policies to work as if they come from a single request authentication policy. Thus, you can have multiple mesh-wide or namespace-wide policies in a mesh or namespace. However, it is still a good practice to avoid having multiple mesh-wide or namespace-wide request authentication policies.
Peer authentication
Peer authentication policies specify the mutual TLS mode Istio enforces on target workloads. The following modes are supported:
- PERMISSIVE: Workloads accept both mutual TLS and plain text traffic. This mode is most useful during migrations when workloads without sidecar cannot use mutual TLS. Once workloads are migrated with sidecar injection, you should switch the mode to STRICT.
- STRICT: Workloads only accept mutual TLS traffic.
- DISABLE: Mutual TLS is disabled. From a security perspective, you shouldn’t use this mode unless you provide your own security solution.
When the mode is unset, the mode of the parent scope is inherited. Mesh-wide
peer authentication policies with an unset mode use the PERMISSIVE mode by
default.
The following peer authentication policy requires all workloads in namespace
foo to use mutual TLS:
apiVersion: security.istio.io/v1beta1
kind: PeerAuthentication
metadata:
  name: "example-policy"
  namespace: "foo"
spec:
  mtls:
    mode: STRICT
With workload-specific peer authentication policies, you can specify different
mutual TLS modes for different ports. You can only use ports that workloads have
claimed for port-wide mutual TLS configuration. The following example disables
mutual TLS on port 80 for the app:example-app workload, and uses the mutual TLS
settings of the namespace-wide peer authentication policy for all other ports:
apiVersion: security.istio.io/v1beta1
kind: PeerAuthentication
metadata:
  name: "example-workload-policy"
  namespace: "foo"
spec:
  selector:
     matchLabels:
       app: example-app
  portLevelMtls:
    80:
      mode: DISABLE
The peer authentication policy above works only because the service
configuration below bound the requests from the example-app workload to port
80 of the example-service:
apiVersion: v1
kind: Service
metadata:
  name: example-service
  namespace: foo
spec:
  ports:
  - name: http
    port: 8000
    protocol: TCP
    targetPort: 80
  selector:
    app: example-app
Request authentication
Request authentication policies specify the values needed to validate a JSON Web Token (JWT). These values include, among others, the following:
- The location of the token in the request
- The issuer or the request
- The public JSON Web Key Set (JWKS)
Istio checks the presented token, if presented against the rules in the request authentication policy, and rejects requests with invalid tokens. When requests carry no token, they are accepted by default. To reject requests without tokens, provide authorization rules that specify the restrictions for specific operations, for example paths or actions.
Request authentication policies can specify more than one JWT if each uses a unique location. When more than one policy matches a workload, Istio combines all rules as if they were specified as a single policy. This behavior is useful to program workloads to accept JWT from different providers. However, requests with more than one valid JWT are not supported because the output principal of such requests is undefined.
Principals
When you use peer authentication policies and mutual TLS, Istio extracts the
identity from the peer authentication into the source.principal. Similarly,
when you use request authentication policies, Istio assigns the identity from
the JWT to the request.auth.principal. Use these principals to set
authorization policies and as telemetry output.
Updating authentication policies
You can change an authentication policy at any time and Istio pushes the new policies to the workloads almost in real time. However, Istio can’t guarantee that all workloads receive the new policy at the same time. The following recommendations help avoid disruption when updating your authentication policies:
- Use intermediate peer authentication policies using the
PERMISSIVEmode when changing the mode fromDISABLEtoSTRICTand vice-versa. When all workloads switch successfully to the desired mode, you can apply the policy with the final mode. You can use Istio telemetry to verify that workloads have switched successfully. - When migrating request authentication policies from one JWT to another, add the rule for the new JWT to the policy without removing the old rule. Workloads then accept both types of JWT, and you can remove the old rule when all traffic switches to the new JWT. However, each JWT has to use a different location.
Authorization
Istio’s authorization features provide mesh-, namespace-, and workload-wide access control for your workloads in the mesh. This level of control provides the following benefits:
- Workload-to-workload and end-user-to-workload authorization.
- A simple API: it includes a single
AuthorizationPolicyCRD, which is easy to use and maintain. - Flexible semantics: operators can define custom conditions on Istio attributes, and use CUSTOM, DENY and ALLOW actions.
- High performance: Istio authorization (
ALLOWandDENY) is enforced natively on Envoy. - High compatibility: supports gRPC, HTTP, HTTPS and HTTP/2 natively, as well as any plain TCP protocols.
Authorization architecture
The authorization policy enforces access control to the inbound traffic in the
server side Envoy proxy. Each Envoy proxy runs an authorization engine that authorizes requests at
runtime. When a request comes to the proxy, the authorization engine evaluates
the request context against the current authorization policies, and returns the
authorization result, either ALLOW or DENY. Operators specify Istio
authorization policies using .yaml files.

Implicit enablement
You don’t need to explicitly enable Istio’s authorization features; they are available after installation. To enforce access control to your workloads, you apply an authorization policy.
For workloads without authorization policies applied, Istio allows all requests.
Authorization policies support ALLOW, DENY and CUSTOM actions. You can apply multiple policies, each with a
different action, as needed to secure access to your workloads.
Istio checks for matching policies in layers, in this order: CUSTOM, DENY, and then ALLOW. For each type of action,
Istio first checks if there is a policy with the action applied, and then checks if the request matches the policy’s
specification. If a request doesn’t match a policy in one of the layers, the check continues to the next layer.
The following graph shows the policy precedence in detail:
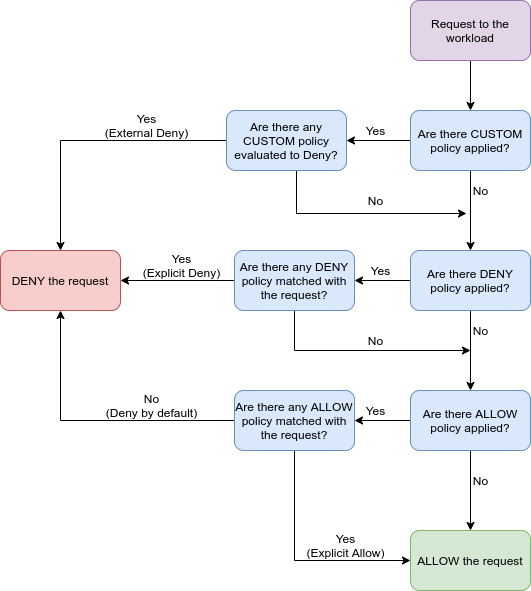
When you apply multiple authorization policies to the same workload, Istio applies them additively.
Authorization policies
To configure an authorization policy, you create an
AuthorizationPolicy custom resource.
An authorization policy includes a selector, an action, and a list of rules:
- The
selectorfield specifies the target of the policy - The
actionfield specifies whether to allow or deny the request - The
rulesspecify when to trigger the action- The
fromfield in therulesspecifies the sources of the request - The
tofield in therulesspecifies the operations of the request - The
whenfield specifies the conditions needed to apply the rule
- The
The following example shows an authorization policy that allows two sources, the
cluster.local/ns/default/sa/sleep service account and the dev namespace, to
access the workloads with the app: httpbin and version: v1 labels in the
foo namespace when requests sent have a valid JWT token.
apiVersion: security.istio.io/v1beta1
kind: AuthorizationPolicy
metadata:
 name: httpbin
 namespace: foo
spec:
 selector:
   matchLabels:
     app: httpbin
     version: v1
 action: ALLOW
 rules:
 - from:
   - source:
       principals: ["cluster.local/ns/default/sa/sleep"]
   - source:
       namespaces: ["dev"]
   to:
   - operation:
       methods: ["GET"]
   when:
   - key: request.auth.claims[iss]
     values: ["https://accounts.google.com"]
The following example shows an authorization policy that denies requests if the
source is not the foo namespace:
apiVersion: security.istio.io/v1beta1
kind: AuthorizationPolicy
metadata:
 name: httpbin-deny
 namespace: foo
spec:
 selector:
   matchLabels:
     app: httpbin
     version: v1
 action: DENY
 rules:
 - from:
   - source:
       notNamespaces: ["foo"]
The deny policy takes precedence over the allow policy. Requests matching allow policies can be denied if they match a deny policy. Istio evaluates deny policies first to ensure that an allow policy can’t bypass a deny policy.
Policy Target
You can specify a policy’s scope or target with the
metadata/namespace field and an optional selector field.
A policy applies to the namespace in the metadata/namespace field. If
set its value to the root namespace, the policy applies to all namespaces in a
mesh. The value of the root namespace is configurable, and the default is
istio-system. If set to any other namespace, the policy only applies to the
specified namespace.
You can use a selector field to further restrict policies to apply to specific
workloads. The selector uses labels to select the target workload. The
selector contains a list of {key: value} pairs, where the key is the name of
the label. If not set, the authorization policy applies to all workloads in the
same namespace as the authorization policy.
For example, the allow-read policy allows "GET" and "HEAD" access to the
workload with the app: products label in the default namespace.
apiVersion: security.istio.io/v1beta1
kind: AuthorizationPolicy
metadata:
  name: allow-read
  namespace: default
spec:
  selector:
    matchLabels:
      app: products
  action: ALLOW
  rules:
  - to:
    - operation:
         methods: ["GET", "HEAD"]
Value matching
Most fields in authorization policies support all the following matching schemas:
- Exact match: exact string match.
- Prefix match: a string with an ending
"*". For example,"test.abc.*"matches"test.abc.com","test.abc.com.cn","test.abc.org", etc. - Suffix match: a string with a starting
"*". For example,"*.abc.com"matches"eng.abc.com","test.eng.abc.com", etc. - Presence match:
*is used to specify anything but not empty. To specify that a field must be present, use thefieldname: ["*"]format. This is different from leaving a field unspecified, which means match anything, including empty.
There are a few exceptions. For example, the following fields only support exact match:
- The
keyfield under thewhensection - The
ipBlocksunder thesourcesection - The
portsfield under thetosection
The following example policy allows access at paths with the /test/* prefix
or the */info suffix.
apiVersion: security.istio.io/v1beta1
kind: AuthorizationPolicy
metadata:
  name: tester
  namespace: default
spec:
  selector:
    matchLabels:
      app: products
  action: ALLOW
  rules:
  - to:
    - operation:
        paths: ["/test/*", "*/info"]
Exclusion matching
To match negative conditions like notValues in the when field, notIpBlocks
in the source field, notPorts in the to field, Istio supports exclusion
matching.
The following example requires a valid request principals, which is derived from
JWT authentication, if the request path is not /healthz. Thus, the policy
excludes requests to the /healthz path from the JWT authentication:
apiVersion: security.istio.io/v1beta1
kind: AuthorizationPolicy
metadata:
  name: disable-jwt-for-healthz
  namespace: default
spec:
  selector:
    matchLabels:
      app: products
  action: ALLOW
  rules:
  - to:
    - operation:
        notPaths: ["/healthz"]
    from:
    - source:
        requestPrincipals: ["*"]
The following example denies the request to the /admin path for requests
without request principals:
apiVersion: security.istio.io/v1beta1
kind: AuthorizationPolicy
metadata:
  name: enable-jwt-for-admin
  namespace: default
spec:
  selector:
    matchLabels:
      app: products
  action: DENY
  rules:
  - to:
    - operation:
        paths: ["/admin"]
    from:
    - source:
        notRequestPrincipals: ["*"]
allow-nothing, deny-all and allow-all policy
The following example shows an ALLOW policy that matches nothing. If there are no other ALLOW policies, requests
will always be denied because of the “deny by default” behavior.
Note the “deny by default” behavior applies only if the workload has at least one authorization policy with the ALLOW action.
apiVersion: security.istio.io/v1beta1
kind: AuthorizationPolicy
metadata:
  name: allow-nothing
spec:
  action: ALLOW
  # the rules field is not specified, and the policy will never match.
The following example shows a DENY policy that explicitly denies all access. It will always deny the request even if
there is another ALLOW policy allowing the request because the DENY policy takes precedence over the ALLOW policy.
This is useful if you want to temporarily disable all access to the workload.
apiVersion: security.istio.io/v1beta1
kind: AuthorizationPolicy
metadata:
  name: deny-all
spec:
  action: DENY
  # the rules field has an empty rule, and the policy will always match.
  rules:
  - {}
The following example shows an ALLOW policy that allows full access to the workload. It will make other ALLOW policies
useless as it will always allow the request. It might be useful if you want to temporarily expose full access to the
workload. Note the request could still be denied due to CUSTOM and DENY policies.
apiVersion: security.istio.io/v1beta1
kind: AuthorizationPolicy
metadata:
  name: allow-all
spec:
  action: ALLOW
  # This matches everything.
  rules:
  - {}
Custom conditions
You can also use the when section to specify additional conditions. For
example, the following AuthorizationPolicy definition includes a condition
that request.headers[version] is either "v1" or "v2". In this case, the
key is request.headers[version], which is an entry in the Istio attribute
request.headers, which is a map.
apiVersion: security.istio.io/v1beta1
kind: AuthorizationPolicy
metadata:
 name: httpbin
 namespace: foo
spec:
 selector:
   matchLabels:
     app: httpbin
     version: v1
 action: ALLOW
 rules:
 - from:
   - source:
       principals: ["cluster.local/ns/default/sa/sleep"]
   to:
   - operation:
       methods: ["GET"]
   when:
   - key: request.headers[version]
     values: ["v1", "v2"]
The supported key values of a condition are listed on the conditions page.
Authenticated and unauthenticated identity
If you want to make a workload publicly accessible, you need to leave the
source section empty. This allows sources from all (both authenticated and
unauthenticated) users and workloads, for example:
apiVersion: security.istio.io/v1beta1
kind: AuthorizationPolicy
metadata:
 name: httpbin
 namespace: foo
spec:
 selector:
   matchLabels:
     app: httpbin
     version: v1
 action: ALLOW
 rules:
 - to:
   - operation:
       methods: ["GET", "POST"]
To allow only authenticated users, set principals to "*" instead, for
example:
apiVersion: security.istio.io/v1beta1
kind: AuthorizationPolicy
metadata:
 name: httpbin
 namespace: foo
spec:
 selector:
   matchLabels:
     app: httpbin
     version: v1
 action: ALLOW
 rules:
 - from:
   - source:
       principals: ["*"]
   to:
   - operation:
       methods: ["GET", "POST"]
Using Istio authorization on plain TCP protocols
Istio authorization supports workloads using any plain TCP protocols, such as MongoDB. In this case, you configure the authorization policy in the same way you did for the HTTP workloads. The difference is that certain fields and conditions are only applicable to HTTP workloads. These fields include:
- The
request_principalsfield in the source section of the authorization policy object - The
hosts,methodsandpathsfields in the operation section of the authorization policy object
The supported conditions are listed in the conditions page. If you use any HTTP only fields for a TCP workload, Istio will ignore HTTP-only fields in the authorization policy.
Assuming you have a MongoDB service on port 27017, the following example
configures an authorization policy to only allows the bookinfo-ratings-v2
service in the Istio mesh to access the MongoDB workload.
apiVersion: security.istio.io/v1beta1
kind: AuthorizationPolicy
metadata:
  name: mongodb-policy
  namespace: default
spec:
 selector:
   matchLabels:
     app: mongodb
 action: ALLOW
 rules:
 - from:
   - source:
       principals: ["cluster.local/ns/default/sa/bookinfo-ratings-v2"]
   to:
   - operation:
       ports: ["27017"]
Dependency on mutual TLS
Istio uses mutual TLS to securely pass some information from the client to the server. Mutual TLS must be enabled before using any of the following fields in the authorization policy:
- the
principalsandnotPrincipalsfield under thesourcesection - the
namespacesandnotNamespacesfield under thesourcesection - the
source.principalcustom condition - the
source.namespacecustom condition
Note it is strongly recommended to always use these fields with strict mutual TLS mode in the PeerAuthentication to avoid
potential unexpected requests rejection or policy bypass when plain text traffic is used with the permissive mutual TLS mode.
Check the security advisory for more details and alternatives if you cannot enable strict mutual TLS mode.
Learn more
After learning the basic concepts, there are more resources to review:
Try out the security policy by following the authentication and authorization tasks.
Learn some security policy examples that could be used to improve security in your mesh.
Read common problems to better troubleshoot security policy issues when something goes wrong.