无需 Gateway API 开始使用
本指南可让您仅使用其旧版 API 快速评估 Istio。如果您想使用 Kubernetes Gateway API, 请参阅该示例。如果您已经熟悉了 Istio 或想要安装其他配置文件或高级的部署模型, 请参阅 FAQ 页面:我应该使用哪种 Istio 安装方法?。
这些步骤需要您有一个运行 Kubernetes (1.29, 1.30, 1.31, 1.32, 1.33) 所支持版本的 cluster。您可以使用任意受支持的平台,例如 Minikube 或特定平台安装说明中指定的其他平台。
遵循以下步骤开始使用 Istio:
下载 Istio
转到 Istio 发布页面下载适合您操作系统的安装文件, 或下载并自动解压最新的版本(Linux 或 macOS):
$ curl -L https://istio.io/downloadIstio | sh -切换到 Istio 文件包目录。例如,如果文件包是
istio-1.26.2:$ cd istio-1.26.2安装目录包含:
- 位于
samples/中的样例应用 - 位于
bin/目录中的istioctl客户端二进制文件。
- 位于
添加
istioctl客户端到您的路径(Linux 或 macOS):$ export PATH=$PWD/bin:$PATH
安装 Istio
本次安装使用
demo配置文件。 这个配置文件包含了便于测试的一组默认值,当然您可以使用其他配置文件用于生产或性能测试。$ istioctl install --set profile=demo -y ✔ Istio core installed ✔ Istiod installed ✔ Egress gateways installed ✔ Ingress gateways installed ✔ Installation complete添加命名空间标签,指示 Istio 在您稍后部署应用时自动注入 Envoy Sidecar 代理:
$ kubectl label namespace default istio-injection=enabled
namespace/default labeled
部署样例应用
部署
Bookinfo示例应用:$ kubectl apply -f @samples/bookinfo/platform/kube/bookinfo.yaml@ service/details created serviceaccount/bookinfo-details created deployment.apps/details-v1 created service/ratings created serviceaccount/bookinfo-ratings created deployment.apps/ratings-v1 created service/reviews created serviceaccount/bookinfo-reviews created deployment.apps/reviews-v1 created deployment.apps/reviews-v2 created deployment.apps/reviews-v3 created service/productpage created serviceaccount/bookinfo-productpage created deployment.apps/productpage-v1 created此应用将启动。随着每个 Pod 就绪,Istio Sidecar 将随之被部署。
$ kubectl get services
NAME          TYPE        CLUSTER-IP      EXTERNAL-IP   PORT(S)    AGE
details       ClusterIP   10.0.0.212      <none>        9080/TCP   29s
kubernetes    ClusterIP   10.0.0.1        <none>        443/TCP    25m
productpage   ClusterIP   10.0.0.57       <none>        9080/TCP   28s
ratings       ClusterIP   10.0.0.33       <none>        9080/TCP   29s
reviews       ClusterIP   10.0.0.28       <none>        9080/TCP   29s
还有
$ kubectl get pods NAME READY STATUS RESTARTS AGE details-v1-558b8b4b76-2llld 2/2 Running 0 2m41s productpage-v1-6987489c74-lpkgl 2/2 Running 0 2m40s ratings-v1-7dc98c7588-vzftc 2/2 Running 0 2m41s reviews-v1-7f99cc4496-gdxfn 2/2 Running 0 2m41s reviews-v2-7d79d5bd5d-8zzqd 2/2 Running 0 2m41s reviews-v3-7dbcdcbc56-m8dph 2/2 Running 0 2m41s确认到此为止一切运行良好。执行以下命令通过检查响应中的页面标题查看应用是否在集群内运行且正在提供 HTML 页面:
$ kubectl exec "$(kubectl get pod -l app=ratings -o jsonpath='{.items[0].metadata.name}')" -c ratings -- curl -sS productpage:9080/productpage | grep -o "<title>.*</title>"
<title>Simple Bookstore App</title>
打开应用并允许对外流量
Bookinfo 应用已被部署但还不能从外部进行访问。 要使其能够被访问,您需要创建 Istio Ingress Gateway, 将路径映射到网格边缘处的某个路由。
将此应用程序与 Istio Gateway 关联:
$ kubectl apply -f @samples/bookinfo/networking/bookinfo-gateway.yaml@
gateway.networking.istio.io/bookinfo-gateway created
virtualservice.networking.istio.io/bookinfo created
确保配置没有问题:
$ istioctl analyze
✔ No validation issues found when analyzing namespace: default.
确定 Ingress IP 和端口
按照以下说明设置用于访问网关的 INGRESS_HOST 和 INGRESS_PORT 变量。
使用选项卡选择适用于您所选平台的说明:
在新的终端窗口中运行此命令以启动将流量发送到 Istio Ingress Gateway 的 Minikube 隧道。
这将为 service/istio-ingressgateway 提供外部负载均衡器及 EXTERNAL-IP。
$ minikube tunnel设置 Ingress 主机和端口:
$ export INGRESS_HOST=$(kubectl -n istio-system get service istio-ingressgateway -o jsonpath='{.status.loadBalancer.ingress[0].ip}')
$ export INGRESS_PORT=$(kubectl -n istio-system get service istio-ingressgateway -o jsonpath='{.spec.ports[?(@.name=="http2")].port}')
$ export SECURE_INGRESS_PORT=$(kubectl -n istio-system get service istio-ingressgateway -o jsonpath='{.spec.ports[?(@.name=="https")].port}')
确保已成功为每个环境变量分配 IP 地址和端口:
$ echo "$INGRESS_HOST"
127.0.0.1
$ echo "$INGRESS_PORT"
80$ echo "$SECURE_INGRESS_PORT"
443执行以下命令来确定您的 Kubernetes 集群是否在支持外部负载均衡器的环境中运行:
$ kubectl get svc istio-ingressgateway -n istio-system
NAME                   TYPE           CLUSTER-IP       EXTERNAL-IP     PORT(S)                                      AGE
istio-ingressgateway   LoadBalancer   172.21.109.129   130.211.10.121  80:31380/TCP,443:31390/TCP,31400:31400/TCP   17h
如果设置了 EXTERNAL-IP 值,则表示您的环境具有可用于 Ingress Gateway 的外部负载均衡器。
如果 EXTERNAL-IP 值为 <none>(或始终为 <pending>),
则表示您的环境不能为 Ingress Gateway 提供外部负载均衡器。在这种情况下,
您可以使用服务的节点端口访问网关。
选择适合您环境的说明:
如果您确定您的环境具有外部负载均衡器,请按照这些说明进行操作。
设置 Ingress IP 和端口:
$ export INGRESS_HOST=$(kubectl -n istio-system get service istio-ingressgateway -o jsonpath='{.status.loadBalancer.ingress[0].ip}')
$ export INGRESS_PORT=$(kubectl -n istio-system get service istio-ingressgateway -o jsonpath='{.spec.ports[?(@.name=="http2")].port}')
$ export SECURE_INGRESS_PORT=$(kubectl -n istio-system get service istio-ingressgateway -o jsonpath='{.spec.ports[?(@.name=="https")].port}')如果您的环境没有外部负载均衡器,请按照这些说明操作并选择节点端口。
设置 Ingress 端口:
$ export INGRESS_PORT=$(kubectl -n istio-system get service istio-ingressgateway -o jsonpath='{.spec.ports[?(@.name=="http2")].nodePort}')
$ export SECURE_INGRESS_PORT=$(kubectl -n istio-system get service istio-ingressgateway -o jsonpath='{.spec.ports[?(@.name=="https")].nodePort}')
GKE:
$ export INGRESS_HOST=worker-node-address您需要创建防火墙规则以允许 TCP 流量进入 ingressgateway 服务的端口。
运行以下命令以允许 HTTP 端口、安全端口(HTTPS)或两者的流量:
$ gcloud compute firewall-rules create allow-gateway-http --allow "tcp:$INGRESS_PORT"
$ gcloud compute firewall-rules create allow-gateway-https --allow "tcp:$SECURE_INGRESS_PORT"
IBM Cloud Kubernetes Service:
$ ibmcloud ks workers --cluster cluster-name-or-id
$ export INGRESS_HOST=public-IP-of-one-of-the-worker-nodes
Docker For Desktop:
$ export INGRESS_HOST=127.0.0.1其他环境:
$ export INGRESS_HOST=$(kubectl get po -l istio=ingressgateway -n istio-system -o jsonpath='{.items[0].status.hostIP}')设置
GATEWAY_URL:$ export GATEWAY_URL=$INGRESS_HOST:$INGRESS_PORT确保 IP 地址和端口均被成功分配给了环境变量:
$ echo "$GATEWAY_URL"
127.0.0.1:80
验证外部访问
通过浏览器查看 Bookinfo 产品页面,确认可以访问 Bookinfo 应用。
执行以下命令检索 Bookinfo 应用的对外地址。
$ echo "http://$GATEWAY_URL/productpage"将上一条命令的输出粘贴到您的 Web 浏览器中,确认 Bookinfo 产品页面显示正常。
查看仪表板
Istio 集成了几种不同的遥测应用。 这些可以帮助您了解服务网格的结构,能够显示网格的拓扑,还能分析网格的健康状况。
参阅以下指示说明部署 Kiali 仪表板, 以及 Prometheus、 Grafana 和 Jaeger。
安装 Kiali 和其他插件并等待其完成部署。
$ kubectl apply -f samples/addons $ kubectl rollout status deployment/kiali -n istio-system Waiting for deployment "kiali" rollout to finish: 0 of 1 updated replicas are available... deployment "kiali" successfully rolled out访问 Kiali 仪表板。
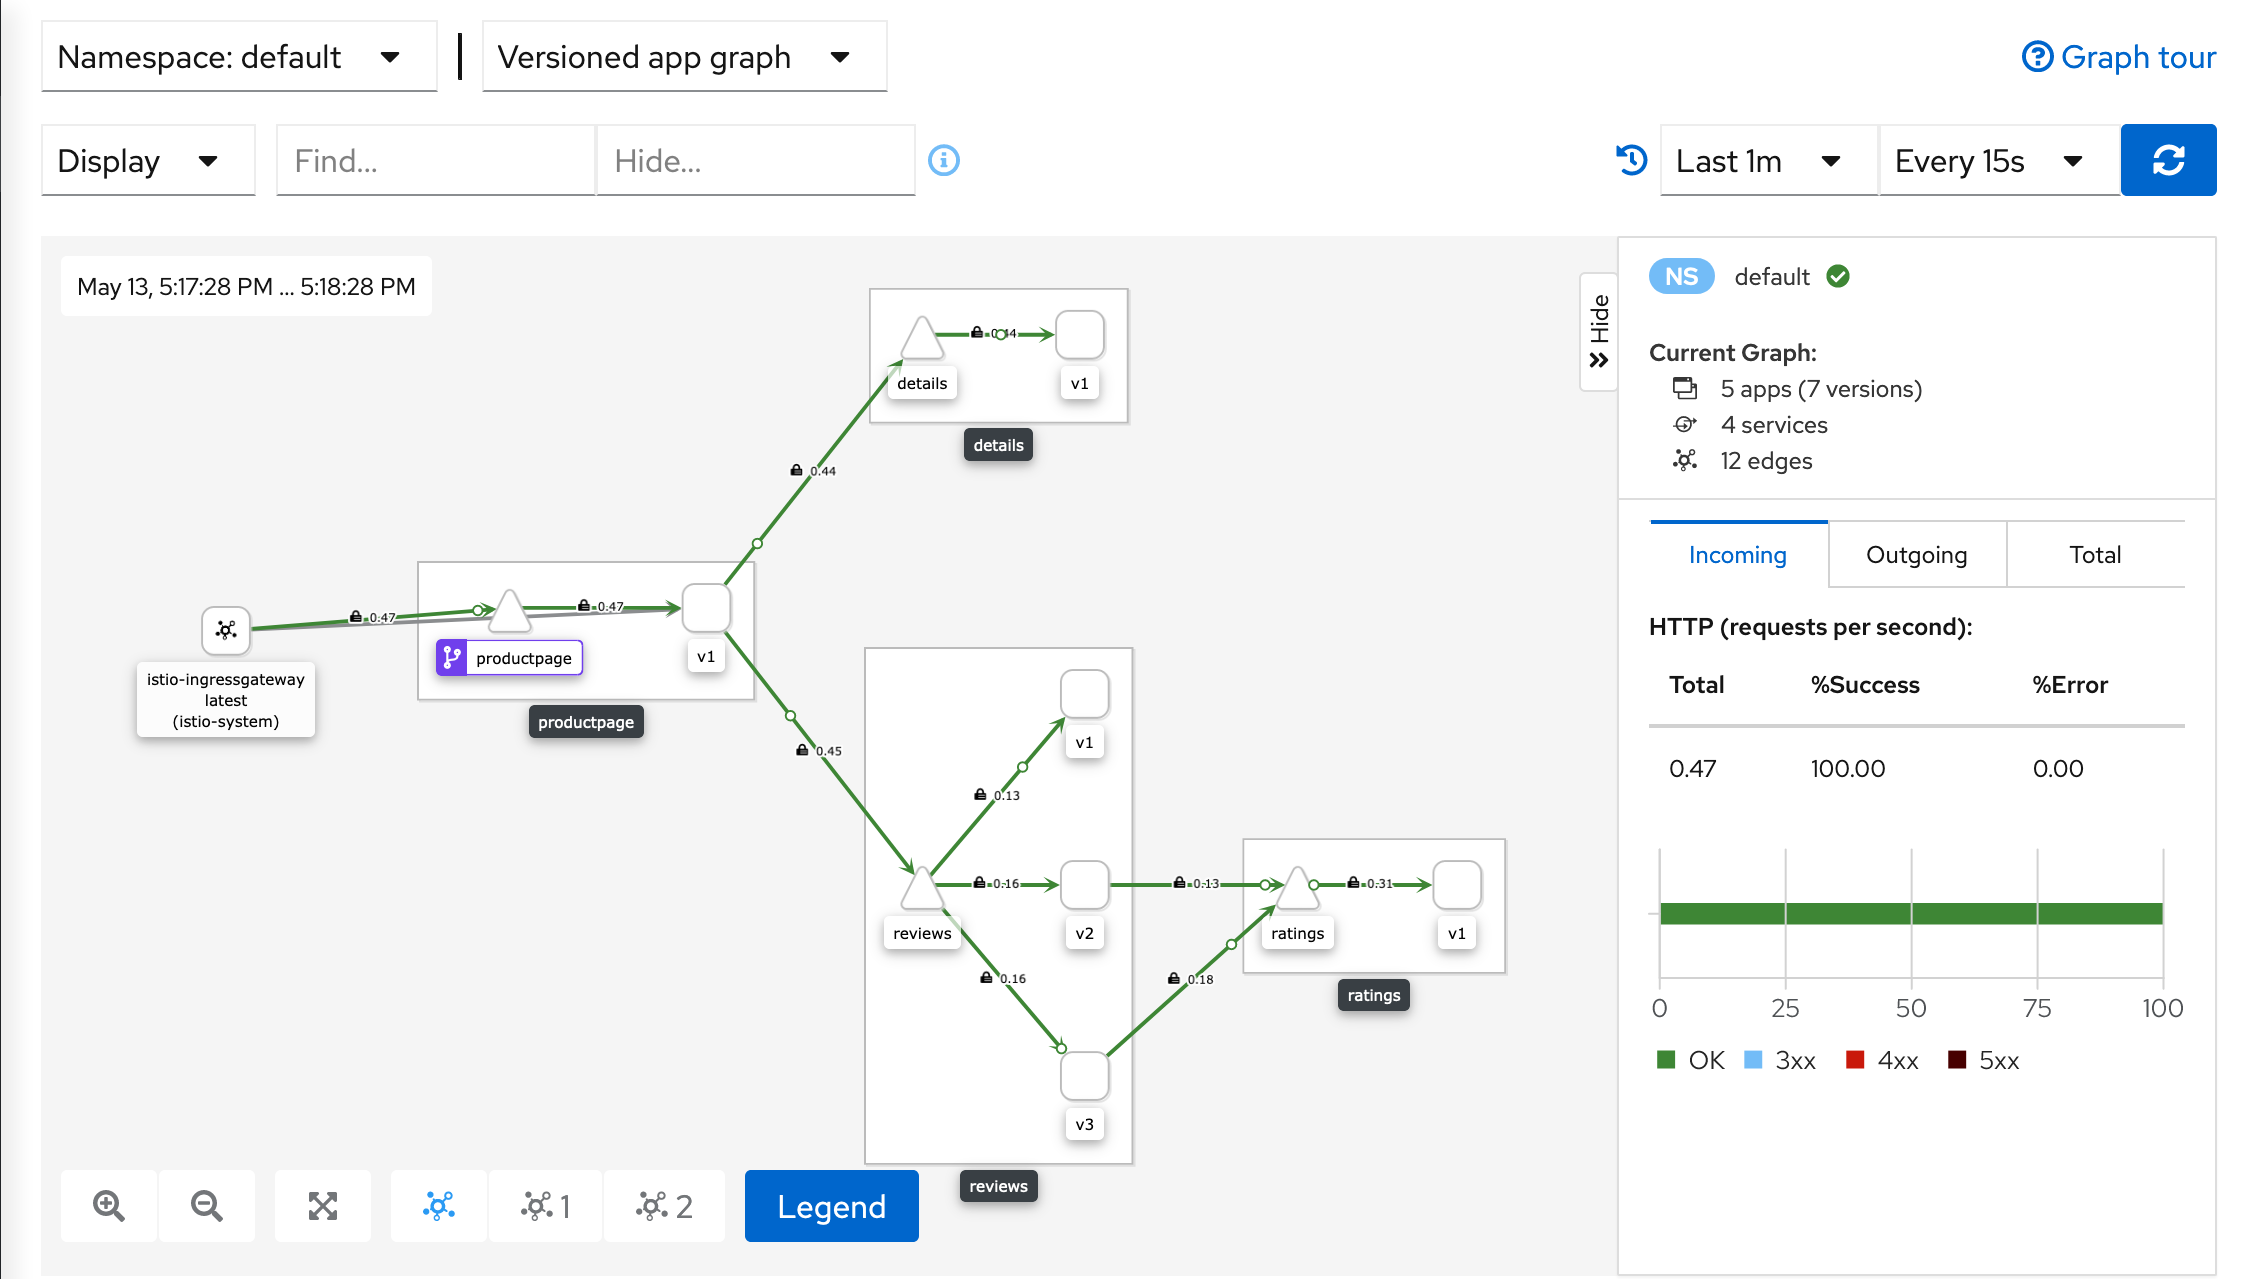
$ istioctl dashboard kiali在左侧导航菜单中,从 Namespace 下拉菜单中选择 Graph,选择 default。
Kiali 仪表板显示了网格的概述以及
Bookinfo样例应用中服务之间的关系。 Kiali 还能过滤显示流量。Kiali Dashboard
下一步
恭喜完成了评估安装!
以下任务便于初学者使用这个 demo 安装进一步评估 Istio 的功能特性:
自定义 Istio 用于生产之前,请参阅以下资源:
加入 Istio 社区
欢迎您加入 Istio 社区提问和给出反馈。
卸载
要删除 Bookinfo 样例应用及其配置,请参阅
Bookinfo 清理。
卸载 Istio 时将删除 RBAC 权限和 istio-system 命名空间下的所有资源层次结构。
可以安全地忽略不存在资源的错误,因为它们可能已经被按层次结构删除了。
$ kubectl delete -f @samples/addons@
$ istioctl uninstall -y --purge
istio-system 命名空间默认未被移除。如果不再需要,请执行以下命令将其移除:
$ kubectl delete namespace istio-system指示 Istio 自动注入 Envoy Sidecar 代理的标签默认未被移除。 如果不再需要,执行以下命令将其移除:
$ kubectl label namespace default istio-injection-